Get Involved/development/IDE configuration/Qt Creator
Qt Creator is an IDE from Qt.
A screen recording version is available https://www.youtube.com/watch?v=ASnDeEaXnbI
Features
Qt Creator is a good choice when starting to contribute to KDE.
Qt Creator has: support for kdesrc-build, a good debugger, source code navigation, Qt widgets UI designer, basic QML editor, QML debugger, Qt resources editor, Qt project templates, good CMake support, C++ static analyzers.
Additional features:
- Source code navigation: switch header/source, follow symbol, switch between function declaration/definition, find references, open type hierarchy, open include hierarchy.
- Refactor rename symbol.
- Views: class view, tests view, document outline view and document outline combo box, CMake structure view, file system view.
For best results, download Qt Creator from the Qt website. https://www.youtube.com/watch?v=QVgInye6HDA
kdesrc-build
After you configure kdesrc-build and you can correctly build a KDE project such as kcalc.
Edit ~/.config/kdesrc-buildrc . It should look like:
...
    include-dependencies true
...
    kdedir ~/kde/usr
...
    source-dir ~/kde/src
...
    build-dir ~/kde/build
...
    cmake-options -DCMAKE_BUILD_TYPE=Debug
...
The line above is important in order to use the debugger from Qt Creator.
Make sure you have the correct number on the line num-cores .
Build kcalc, make sure there are no errors:
kdesrc-build kcalc
Install Qt Creator
Using the Qt online installer - recommended
The newest version of Qt Creator installed from the Qt website will have the latest features and the latest bug fixes.
Video version https://www.youtube.com/watch?v=QVgInye6HDA
Go to https://www.qt.io/ on the top right click on the button "Download. Try.". The web browser navigates to "https://www.qt.io/download", in the top right quarter of the page it says "Open source user? Find out how you can use Qt under the (L)GPL and contribute to the Qt project. Download open source". Click on the button "Download open source". The web browser navigates to https://www.qt.io/download-open-source. In the bottom middle of the page it says "Looking for Qt binaries? Find them in the Qt Online Installer. It will steer you to the right download version and help you install tools and add-on components that are available for your open source license. Download the Qt Online Installer". Click on the button "Download the Qt Online Installer" > Linux > "Qt Online Installer for Linux (64-bit)". A file named e.g. qt-unified-linux-x64-4.6.1-online.run is downloaded.
chmod +x qt-unified-linux-x64-4.6.1-online.run
./qt-unified-linux-x64-4.6.1-online.run
The Qt online installer will start. The Qt online installer requires that you create an online user account for https://www.qt.io .
From Linux OS binary packages
E.g.
apt install qtcreator
QML Designer
Qt Creator has a "forms editor" for QML. You can enable it from the Qt Creator main menu > Help > About Plugins... > Qt Quick > enable "QmlDesigner". If it asks you to restart Qt Creator, do it.
Test it. From Qt Designer main menu > File > Close all Files and Editors. File > New Project... > Application (Qt) > Qt Quick Application, finish the wizard correctly. Open the file "Main.qml" in "Switch to Edit mode Ctrl+2". In the left hand side, choose "Switch to Design mode Ctrl+3".
From the Qt Creator main menu > View > Workspaces > Views-All. Close all of the tool windows (views) that you do not need, e.g. "3D", "States", "Timeline", "Curves", "Transitions".
Load a KDE git repository in Qt Creator
We use kcalc as the example KDE git repository. Make sure it was built correctly using kdesrc-build.
kdesrc-build kcalc
Start Qt Creator. E.g. from the KDE Application Launcher (or from KRunner Alt+F2).
From the qtcreator main menu
File > Close All Projects and Editors
File > Open File or Project ~/kde/src/kcalc/CMakeLists.txt
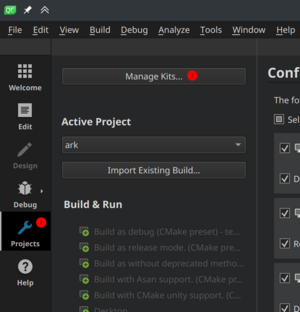
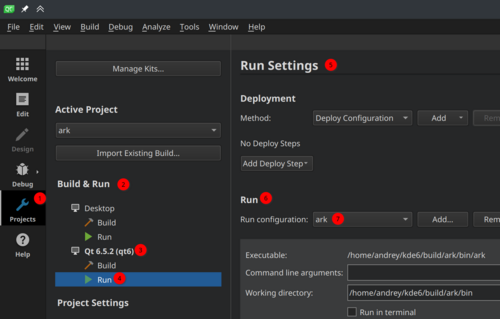
Left Sidebar > Switch to Projects mode Ctrl+5 > Manage Kits...
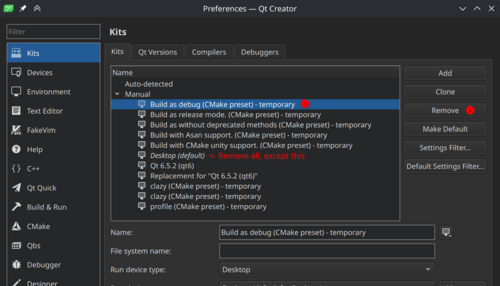
Under "Kits > Manual", remove all kits except "Desktop (default)" or "Qt (default)". E.g. select Manual > "Imported Kit" > press the "Remove" button > press the "OK" button. Make sure that you have removed all kits with name ending in "- temporary".
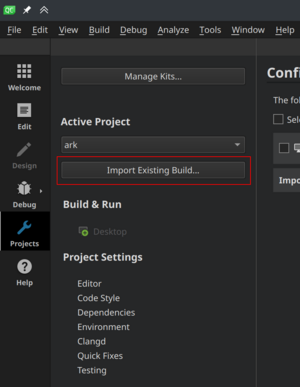
Button "Import Existing Build..." > Directory: ~/kde/build/kcalc > Choose.
CMake should be configured correctly. CMake is run automatically, see "General Messages Alt+7".
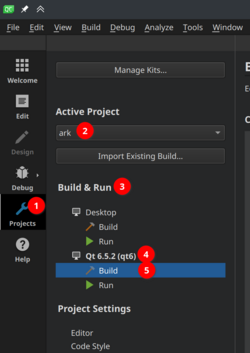
Left Sidebar > Switch to Projects mode Ctrl+5 > Active project: kcalc. Build & Run: not the Desktop kit (e.g. "Imported Kit") > Build.
Build Settings > Edit build configuration: "Debug2".
Translate the content of the file ~/kde/build/kcalc/prefix.sh to the syntax of Qt Creator "Batch Edit". E.g. for Debian based distributions if ~/kde/build/kcalc/prefix.sh is like:
export PATH=/home/username/kde/usr/bin:$PATH

# LD_LIBRARY_PATH only needed if you are building without rpath
# export LD_LIBRARY_PATH=/home/username/kde/usr/lib/x86_64-linux-gnu:$LD_LIBRARY_PATH

export XDG_DATA_DIRS=/home/username/kde/usr/share:${XDG_DATA_DIRS:-/usr/local/share/:/usr/share/}
export XDG_CONFIG_DIRS=/home/username/kde/usr/etc/xdg:${XDG_CONFIG_DIRS:-/etc/xdg}

export QT_PLUGIN_PATH=/home/username/kde/usr/lib/x86_64-linux-gnu/plugins:$QT_PLUGIN_PATH
export QML2_IMPORT_PATH=/home/username/kde/usr/lib/x86_64-linux-gnu/qml:$QML2_IMPORT_PATH

export QT_QUICK_CONTROLS_STYLE_PATH=/home/username/kde/usr/lib/x86_64-linux-gnu/qml/QtQuick/Controls.2/:$QT_QUICK_CONTROLS_STYLE_PATH
Then the same thing in the syntax of Qt Creator "Batch Edit" looks like this block of text:
PATH=+/home/username/kde/usr/bin
XDG_DATA_DIRS=+/home/username/kde/usr/share
XDG_CONFIG_DIRS=+/home/username/kde/usr/etc/xdg
QT_PLUGIN_PATH=+/home/username/kde/usr/lib/x86_64-linux-gnu/plugins
QML2_IMPORT_PATH=+/home/username/kde/usr/lib/x86_64-linux-gnu/qml
QT_QUICK_CONTROLS_STYLE_PATH=+/home/username/kde/usr/lib/x86_64-linux-gnu/qml/QtQuick/Controls.2/
Note: if you want to see debugging messages, you can add corresponding variables here. See Guidelines and HOWTOs/Debugging/Using Error Messages#Controlling_Messages
You probably want to save the above block of text, in order to reuse it when loading other KDE git repositories in Qt Creator. E.g. to file ~/kde/qtcreator_run_environment.txt.
Left Sidebar > Switch to Projects mode Ctrl+5 > Build & Run: not the Desktop kit (e.g. "Imported Kit") > Run. Run Settings > Run > Run configuration: select "kcalc". This is the CMake executable target for the GUI application kcalc. The other items in the combobox e.g. "knumbertest" are binary executable (CTest type) tests.
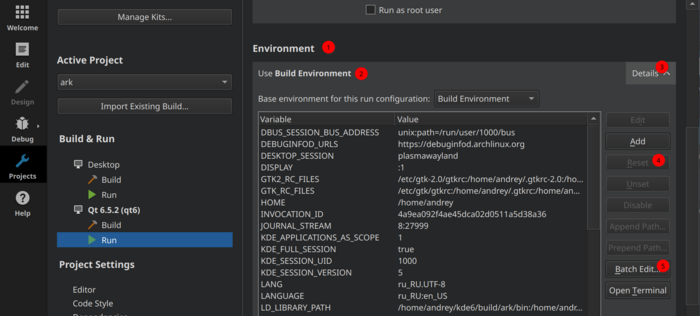
Environment > Use Build Environment > press the Details button > press the "Reset" button if possible > press the "Batch Edit..." button. Paste in there, the text block that you prepared above, then press the OK button.
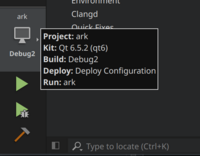
Click on the left sidebar, the button above "Run Ctrl+R". It should show: Project: kcalc. Kit: not the Desktop kit (e.g. "imported Kit"). Deploy: Deploy Configuration. Build: Debug2. Run: kcalc.
CMake configure was run automatically. You can run it again from the Qt Creator main menu > Build > Run CMake.
You can build by pressing the hammer icon on the lower left with tooltip "Build Project Ctrl+B". Or from the Qt Creator main menu > Build > "Build Project Ctrl+B".
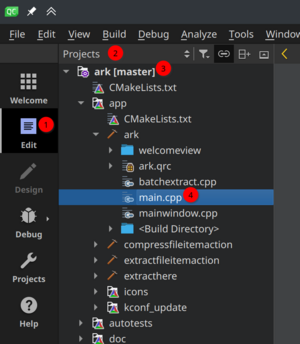
Left Sidebar > Switch to Edit mode (Ctrl+2) > Select "Projects" from the combobox (the other interesting combobox item is "File System"). In the "Projects" left hand treeview > kcalc > kcalc > Source Files > double click on the file kcalc.cpp. The file kcalc.cpp will be shown in the editor view. Click inside the source code in text editor.
In the text editor's top bar > function/identifier/method/type/symbols combobox, select the last item: main(int, char**) -> int. Click on the line with the opening curly bracket of the function main. From the main menu > Debug > Set or Remove Breakpoint (F9).
Left Sidebar > Start debugging of startup project. The debugger will start correctly and break on the source code line with the curly bracket.
From the main menu Debug > Step Over (F10)/Step Into(F11)/Step Out (Shift+F11).
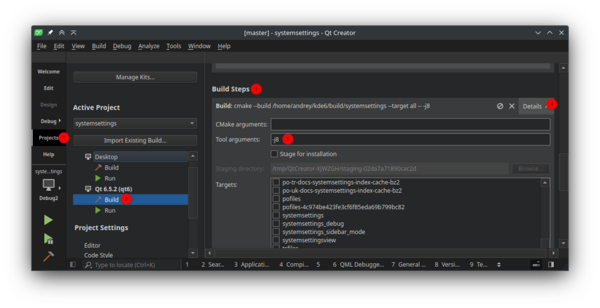
Enable parallel jobs in Qt Creator
- Left Sidebar > Switch to Projects mode (Ctrl+5).
- Under the Build settings of the imported kit find the "Build Steps" option.
- Click on the "Details" button on the right side of the "Build Steps" option to access the detailed build configuration.
- Under the "Tool arguments" field add the argument
-j<jobs>. Replace "<jobs>" with the desired number of parallel jobs you want to use during compilation. For example, if you have a CPU with 16 threads and want to use 12 parallel jobs, you would enter-j12.
- Rebuild your project to get faster compilation.
Tips and Tricks
Custom executable to run
When developing a library, it may be convenient to launch some application that uses it, from the current project. For example, you work with Ark's libraries used in dolphin context menu actions. You can make your run configuration to launch custom binary - dolphin. See documentation on how to configure that.

