Infrastructure/GitLab: Difference between revisions
(Remove workflow section, why is this at the beginning before you even log in?) |
(Clean up logging in section some more) |
||
| Line 6: | Line 6: | ||
Navigate to https://invent.kde.org/users/sign_in and log in using the username and password for your KDE Identity account. | Navigate to https://invent.kde.org/users/sign_in and log in using the username and password for your KDE Identity account. | ||
If you don't have an KDE Identity you can [https://identity.kde.org/index.php?r=registration/index sign up for one here]. | If you don't have an KDE Identity already you can [https://identity.kde.org/index.php?r=registration/index sign up for one here]. You will be required to provide a name and a email address. When selecting your username, please select something which has a relation to your real name. These details will be synced to GitLab once you have logged in and will also become your primary Git email address. You may receive some email spam as a consequence. | ||
{{Note|It is recommended that you use the same e-mail address across all KDE services, including [http://bugs.kde.org bugs.kde.org], or else the merge request hookscripts that automatically close bugzilla tickets won't work. If you don't have an account in [http://bugs.kde.org bugs.kde.org] already, please create one as well.}} | |||
{{Note|If you are a KDE developer, you are required to setup Two-Factor-Authentication (2FA). This can be done using either a Webauthn token (such as a Yubikey) or Time-based one-time password (TOTP) generated using the app of choice (such as [https://apps.kde.org/de/keysmith/ KDE Keysmith]). Should you lose access to your 2FA device you can obtain a recovery token to log back in via SSH, as described in the [https://invent.kde.org/help/user/profile/account/two_factor_authentication.md#generate-new-recovery-codes-using-ssh GitLab Documentation].}} | {{Note|If you are a KDE developer, you are required to setup Two-Factor-Authentication (2FA). This can be done using either a Webauthn token (such as a Yubikey) or Time-based one-time password (TOTP) generated using the app of choice (such as [https://apps.kde.org/de/keysmith/ KDE Keysmith]). Should you lose access to your 2FA device you can obtain a recovery token to log back in via SSH, as described in the [https://invent.kde.org/help/user/profile/account/two_factor_authentication.md#generate-new-recovery-codes-using-ssh GitLab Documentation].}} | ||
=== Setting up Git === | === Setting up Git === | ||
You will need to set up git to use you account details to help identify your work | You will need to set up git to use you account details to help identify your work. Make sure that these details match your GitLab profile, otherwise commits can't be traced back to your account. | ||
<syntaxhighlight lang="bash"> | <syntaxhighlight lang="bash"> | ||
git config user.name <Your Real Name> | $ git config --global user.name <Your Real Name> | ||
git config user.email <Your identity.kde.org email> | $ git config --global user.email <Your identity.kde.org email> | ||
</syntaxhighlight> | </syntaxhighlight> | ||
In order to authenticate yourself when pushing code changes, you need to add a SSH key to your GitLab profile as [https://invent.kde.org/help/user/ssh.md described here]. | |||
In order to authenticate yourself when pushing code changes, you need to add a | |||
== Submitting a merge request == | == Submitting a merge request == | ||
Revision as of 15:54, 21 January 2023
KDE uses a GitLab instance at https://invent.kde.org for code review (as well as hosting and other important collaboration tasks). This page is intended to serve as a general-purpose introduction to the most important aspects: submitting and reviewing Merge Requests.
Logging in
Navigate to https://invent.kde.org/users/sign_in and log in using the username and password for your KDE Identity account.
If you don't have an KDE Identity already you can sign up for one here. You will be required to provide a name and a email address. When selecting your username, please select something which has a relation to your real name. These details will be synced to GitLab once you have logged in and will also become your primary Git email address. You may receive some email spam as a consequence.
Setting up Git
You will need to set up git to use you account details to help identify your work. Make sure that these details match your GitLab profile, otherwise commits can't be traced back to your account.
$ git config --global user.name <Your Real Name>
$ git config --global user.email <Your identity.kde.org email>
In order to authenticate yourself when pushing code changes, you need to add a SSH key to your GitLab profile as described here.
Submitting a merge request
Contributing to KDE code using GitLab involves submitting a Merge Request. A Merge Request is a request to merge some of your code into the project's permanent source code repo. Here's how:
Build the project from source and make your change
First you need to check out the project, compile it from source, and make some changes that you would like to submit to KDE! Instructions for doing this can be found at Get Involved/development. You will wind up with a checkout of the project at ~/kde/src/[the project name] with some local changes applied to it.
Fork the project
Once you have made some local changes that you would like to submit to KDE, you need to create a personal fork of the project and push your changes to the forked copy.
Navigate to https://invent.kde.org/explore/groups and locate the project. If it is not visible in the list, you can use the search field. Once you find the project, click on it:
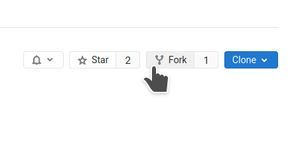
On the project's page, click on the "Fork" button in the top-right corner of the screen:
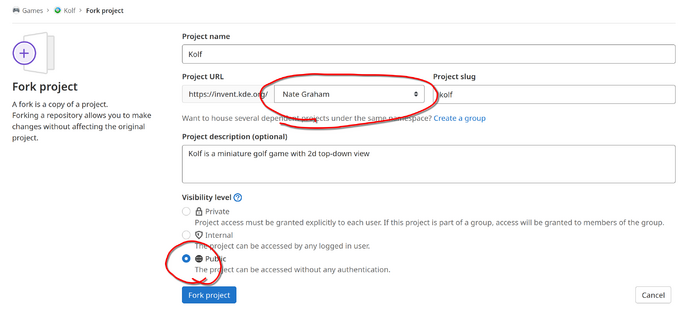
This will take you to a page asking you some details about how you want to fork the project. Select Your Name in the "Project URL" section and "Public" in the "Visibility level" section:
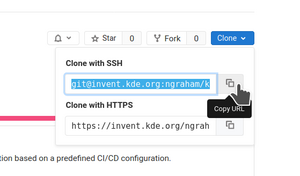
After a moment, the system will finish creating the fork and take you to the page for your fork. On that page, click on the blue "Clone" button in the top-right corner:
In the pop-up that appears, click on the "Copy" button to the right of the upper text field. This will copy the URL for the fork onto your clipboard.
Add the fork to your source checkout
Next, open your terminal app and navigate to the location where the project's repo lives (i.e. ~/kde/src/[the project name]).
You need to add your fork as a remote to the existing repo:
git remote add fork [the URL you copied to your clipboard]
Run "git remote -v". You should see something like this:
$ git remote -v
fork git@invent.kde.org:ngraham/kid3.git (fetch)
fork git@invent.kde.org:ngraham/kid3.git (push)
origin https://invent.kde.org/kde/kid3.git (fetch)
origin https://invent.kde.org/kde/kid3.git (push)
This means you have two remotes set up for your repo: "origin" points to the original repo, and "fork" points to your fork of it.
Make a Branch and Commit
Now that you have your fork set up, it's time to create a branch to track your work and make a commit.
git checkout -b my_awesome_feature
git add [the files you changed]
git commit
Write a good commit message
Please follow commit message best practices: write a descriptive title in the form of an imperative sentence (e.g. "Fix button disappearing when view is changed") and on the next line, write at least one sentence describing your change and why it is necessary, and adding more details if necessary.
If your patch is intended to fix a Bugzilla ticket, include the following on its own line:
BUG: 385942
(The number should be just the Bugzilla ticket number, not the full URL)
For example a commit message might read:
Close memory leak in GC

The GC was doing a bad job and leaking memory. Explicitly call delete where necessary.

BUG: 385942
FIXED-IN: 5.0.0
Here is more information about other special messages that interact with Bugzilla tickets.
Push to your fork
At this point you have a branch in your local repository called "my_awesome_feature" (Hopefully, in reality, it is named something a bit more appropriate!) that has a commit on it with your work. Now push it to your fork:
git push fork my_awesome_feature
This will produce a message somewhat like this:
$ git push fork my_awesome_feature
Enumerating objects: 5, done.
Counting objects: 100% (5/5), done.
Delta compression using up to 4 threads
Compressing objects: 100% (3/3), done.
Writing objects: 100% (3/3), 303 bytes | 303.00 KiB/s, done.
Total 3 (delta 2), reused 0 (delta 0)
remote: This commit is available for viewing at:
remote: https://invent.kde.org/ngraham/kid3/commit/23a702439f494806cf3cfe14f212df58a0075bba
remote:
remote: To create a merge request for my_awesome_feature, visit:
remote:   https://invent.kde.org/ngraham/kid3/merge_requests/new?merge_request%5Bsource_branch%5D=my_awesome_feature
remote:
To invent.kde.org:ngraham/kid3.git
 * [new branch]        my_awesome_feature -> my_awesome_feature
Create the merge request
Notice the "To create a merge request for my_awesome_feature..." message in the output of the push command (explained in the previous section). You can copy-and-paste the URL shown below it into a web browser. On some terminal apps, such as Konsole and Yakuake, you can ctrl+click on the link to go right there!
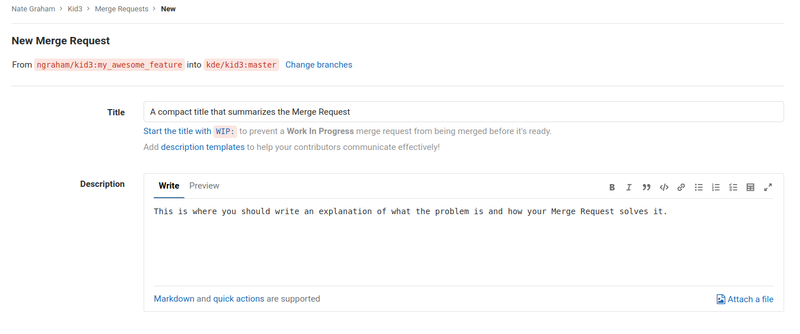
You will be taken to a web page that looks like this:
In the Description section, write at least one sentence describing your change and why it is necessary, adding more details if needed. Tag any of the following teams in the description text based on what kind of review you would like:
- General QA review: @teams/qa
- Visual and UI review: @teams/vdg (please add before-and-after screenshots)
- Usability review: @teams/usability
- Questions about translations: @teams/localization
If your patch is intended to fix a Bugzilla ticket, include the ticket number at the bottom of the description, just like how you did in the commit message (as explained in Infrastructure/GitLab#Write_a_good_commit_message):
BUG: 385942
FIXED-IN: 5.21
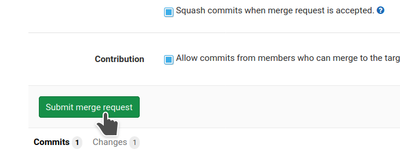
Once you're done with that, click the "Submit Merge Request" button!
What happens next?
After you've submitted your Merge Request, KDE developers who work with the software in question will review it and provide feedback. This can often take a few days. However, if nobody has responded after a week, it's likely that the review was overlooked (sorry about that!) and it's appropriate to make a comment saying, "Ping!" or something to that effect.
Once the Merge Request is accepted, KDE Developers will merge it for you!
Making changes to a merge request
Oftentimes, reviewers will request changes before the Merge Request can be merged. To accomplish this you need to make the requested changes locally and then create a new commit including your changes. First, stage all changed files:
git add -u
Now make a new commit with the staged files:
git commit
Then push the local branch with the new commit on it up to the remote branch:
git push fork
Rebasing a Merge Request
When other changes have been made to the project's source code repo since you submitted your Merge Request, you will need to rebase the Merge Request to incorporate those changes.
Confirm that you have the origin setup correctly by issuing git remote -v:
fork    git@invent.kde.org:developer/projectfork.git (fetch)
fork    git@invent.kde.org:developer/projectfork.git (push)
origin  https://invent.kde.org/applicationgroup/originalproject.git (fetch)
origin  https://invent.kde.org/applicationgroup/originalproject.git (push)
It doesn't matter whether the original project is of type https:// or git@, as you'll just fetch it.
If you instead see:
origin    git@invent.kde.org:developer/projectfork.git (fetch)
origin    git@invent.kde.org:developer/projectfork.git (push)
You'll need to rename your origin to fork or any similar name that is easily recognizable and add the original project as your new origin:
# Rename your origin to "fork"
git remote rename origin fork
# Add new origin project
git remote add origin https://invent.kde.org/applicationgroup/originalproject.git
Now you may proceed:
# First, make sure you are on the branch for your Merge Request
git checkout mybranch
# Now fetch the new changes in the repository
git fetch
# And finally rebase it
git pull --rebase origin master
At this point there may be merge conflicts. If there are, git will tell you which files have conflicts. You can then open each file and resolve the conflict by editing the contents to keep only the appropriate change. In order to accomplish that you can either make each change manually or you can use git mergetool which will open a diff tool of your choice (if there's any installed).
If you use a diff tool like meld, for example, the origin will be shown on the left, your fork will be shown on the right, and you may pick which changes to apply to the middle file, the new one.
After resolving the existing conflicts, run git add [file path] on each conflicted file once all the conflicts have been resolved. Lastly, run git rebase --continue to finish the rebase.
Now, you need to overwrite the version of the Merge Request on your remote branch with the version on your local branch. To do this, you have to force-push:
git push --force fork
Cherry-picking a merge request's commit to another branch
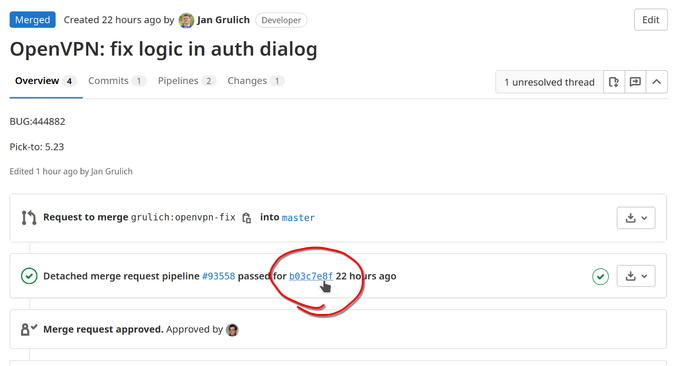
If a Merge Request was labeled with the "cherry-pick" label, it should be manually cherry-picked to the branch corresponding to target milestone after it is merged to master. To do this, click on the link to the commit that was generated:
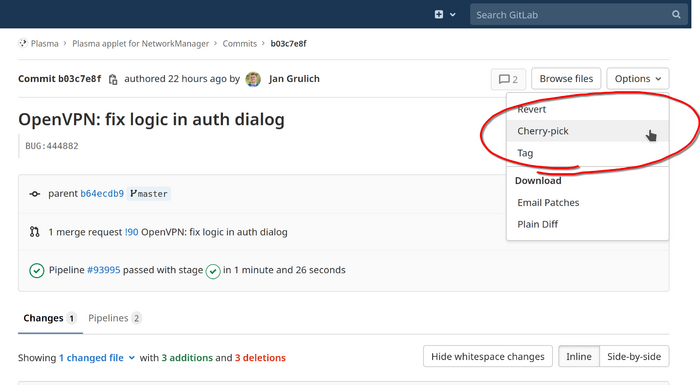
On that page, click the "Options" button and then "Cherry-Pick" from its drop-down menu:
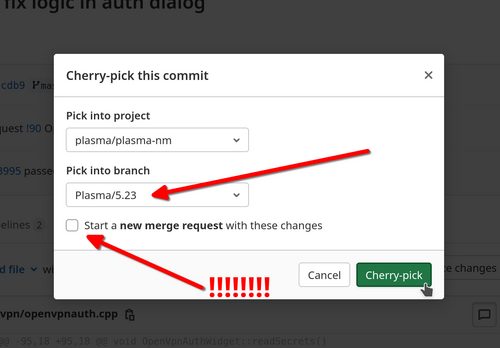
In the dialog that appears, select the branch you want to cherry-pick the commit to. And then uncheck the "checkbox marked "Start a new merge request with these changed" Always uncheck this checkbox!
You can also manually cherry-pick the commit using the git command line. When doing so, always add the -x option to git-cherry-pick.
Testing Someone Else's Merge Request
First you'll need a development environment set up. If you haven't done that yet, it's time to do so. Follow the instructions on Get_Involved/development#Set_up_your_development_environment. It is also advisable to use the git mr tool, part of the Git Extras project, which makes testing Merge Requests a breeze. Here's how to install Git Extras for various Linux distributions:
Arch Linux
- The git-extras packages is not available in the Arch Linux repositories, only the AUR, so it needs to be built and installed with makepkg.
- For more information on using makepkg refer to its manual or Arch Linux Wiki entry.
cd /tmp
git clone https://aur.archlinux.org/git-extras.git
cd ./git-extras
makepkg -si
cd /tmp
rm -rd /tmp/git-mr
Debian, Ubuntu, & KDE Neon
sudo apt install git-extras
Fedora
sudo dnf install git-extras
Manjaro
- The git-extras package is not available in the Manjaro repositories, only the AUR, so it needs to be built and installed with pamac.
pamac build git-extras
OpenSUSE Leap 15.3
- The git-extras package is not available in the default OpenSUSE 15.3 repositories but it is available in the experimental devel:tools:scm repository.
sudo zypper addrepo https://download.opensuse.org/repositories/devel:tools:scm/15.4/devel:tools:scm.repo
sudo zypper refresh
sudo zypper install git-extras
OpenSUSE Leap 15.4
- The git-extras package is not available in the default OpenSUSE 15.4 repositories but it is available in the experimental devel:tools:scm repository.
sudo zypper addrepo https://download.opensuse.org/repositories/devel:tools:scm/15.4/devel:tools:scm.repo
sudo zypper refresh
sudo zypper install git-extras
OpenSUSE Tumbleweed
- The git-extras package is not available in the default OpenSUSE Tumbleweed repositories but it is available in the experimental devel:tools:scm repository.
sudo zypper addrepo https://download.opensuse.org/repositories/devel:tools:scm/openSUSE_Tumbleweed/devel:tools:scm.repo
sudo zypper refresh
sudo zypper install git-extras
- While the git-extras package is not available in the default OpenSUSE Tumbleweed repositories, the git mr tool itself has been packaged standalone and is available for those that don't want or need the full git-extras package.
sudo zypper install git-mr
Check Out the Merge Request and Compile the Software
First check out or enter the source repository for the software that's being patched. For example, let's say you want to test a Merge Request for Okular. If you've never built it before, check it out and build it once first:
kdesrc-build okular
Now go to its source directory:
cd ~/kde/src/okular
Find the Merge Request's ID. For example, for https://invent.kde.org/kde/okular/merge_requests/80, the ID is 80.
...and apply the Merge Request:
git mr 80
Now it's time to compile and run the software to make sure that the Merge Request does what it says it does and doesn't cause any regressions! Compile the patched source code:
kdesrc-build okular --no-src --resume-from okular
Those arguments will tell kdesrc-build to not update the source code and to not build any dependencies.
If it didn't compile, that's reason alone to reject the Merge Request! Go to the web page for the Merge Request and report your findings.
Perform QA
If it did compile, then it's time to perform QA because it's important to thoroughly test Merge Requests to ensure that bad code and regressions don't slip in. This is the entire purpose of having a review infrastructure and it is very important!
First make sure the unit tests all pass:
cd ~kde/build/kde/applications/okular
ctest
If any tests fail, report this through a comment on the Merge Request's web page.
Next, if it's not clear how to test the Merge Request, leave a comment gently explaining this and asking for the submitter to change the Description section to describe how to test it.
Once you know how to test the Merge Request, use the software with the Merge Request applied. Test whether it crashes on launch, whether the main UI appears, and so on. If the Merge Request references any bug reports, read them, understand what issue they are reporting, and test the change to make sure it fixes the bugs.
Next, try to break the Merge Request. Here are some ideas:
- Remove the program's configuration file (~/.config/<program name>rc) and re-open it
- Try the program with multiple HiDPI scale factors and without one at all, different font sizes, or languages known to have long text like German or Brazilian Portuguese
- If it's a new feature, feed it unexpected input
- Test related functionality
A good Merge Request will handle corner cases and variations in configuration. The price of configurability is vigilant testing! We owe it to our users to test using many configurations, not just the defaults or our personal settings.
If the result of your testing is positive because the change fixes all referenced bugs and causes no regressions, leave a comment mentioning that you performed QA and are approving on the basis of QA, and click the Approve button!
If not, apply the "Needs Changes" label and write a comment describing the issues you discovered. It is permissible to do this even if you have not been specified as a reviewer! Anyone can reject a Merge Request on the grounds that it does not work, does not do what it says it does, or causes regressions.
Perform code review
A good overview for how to review changes can be found at https://google.github.io/eng-practices/review/reviewer/.
Engage with the author and other reviewers
After you have ran the program and evaluated the Merge Request, it's time to leave some review comments on the webpage. If you have been specified as a reviewer, or are a member of a group that has been specified as a reviewer, it is permissible to Accept the Merge Request. Keep in mind that reviewing involves responsibility: you are giving a thumbs-up to code that will be run potentially by millions of people. If you accept and land a Merge Request that causes regressions, you will be expected to help fix it if the original author cannot or has disappeared. It is important to take the reviewer role seriously.
Advanced topics
Curating your merge request commit history
For large or complex merge requests, it is strongly recommended to separate the pieces of your proposed change into individual commits--one for each component of the proposed change. For example, perhaps you are working on a feature that consists of multiple logically separable elements that nonetheless all live in the same source repo, or perhaps you are first doing some code refactoring, then you add a backend feature, then finally you add a front-end user interface for it.
For this workflow, specifically mention in the merge request description that you would like reviewers to review individual commits separately, and not squash when merging.
If you need to later make changes to your Merge Request, do not add new commits; instead, combine the new changes with one of the existing commits using Git's interactive rebasing feature. To learn how to do this, see https://git-rebase.io/
Using work branches instead of forks
If you have a developer account, you don't need to use forks to submit merge requests. Instead, make sure your branch name begins with work/ and push it straight to the main repo. work/ branches are treated specially, as you can use git push --force with them. By convention, it is recommended to add your KDE username to the branch, so the final name would end up looking like work/your-username/my-awesome-feature.
To make it easier creating new work branches (instead of typing work/your-username/branch-name every time), you can use a Git script to do that; for example, if you create a shell script somewhere in your PATH, and name it e.g. git-work (the script name must start with git-), and make the script executable:
#!/usr/bin/bash
if [ -z "$1" ]; then
    echo "Cannot create a work branch with an empty name after the last /"
    exit 1
fi

git checkout -t origin/master -b work/your-user-name/$1
you can then use:
git work branch-name
which will create a branch called work/your-username/branch-name that tracks origin/master and then switches to the newly created branch.
Switching the target branch of a merge request
Sometimes you will submit a merge request that is targeting the master branch, but will later be asked to target the stable branch instead because it is a bugfix or, perhaps, you have targeted the stable branch but the commit is considered too invasive and you are asked to target the master branch instead. In either of those circumstances you will need to re-target your Merge Request. Here's how:
git checkout [the local branch for your merge request]
git fetch
git rebase -i origin/[the name of the remote branch you want to target; for example release/19.12]
This will open a text editor showing a list of commits, each on a separate line. Delete all of the lines of text except for the ones corresponding to new commits you have added as part of your merge request. Next, fix any merge conflicts if there are any.
Then force-push the branch up to GitLab again:
git push --force fork
Finally, edit the merge request by clicking the "Edit" button in the top-right corner of the page and choose the desired different target branch:
Note that after merging a Merge Request to the stable branch, you are expected to merge that branch back to master afterwards:
git fetch origin
git checkout release/19.12
git pull
git checkout master
git pull
git merge -s recursive -Xours release/19.12
git diff origin/master     # Are the changes what you expected?
git push
Pushing commits to somebody else's fork
Sometimes someone will say "Hey, let's work on my branch together," so you will be pushing commits to neither origin nor your fork, but to someone else's fork. Let's say you are asked to help work on joliveira's "gsoc2019_numberFormat" branch.
First, you would need to add the URL for his fork as a remote:
$ cd ~/kde/src/okular
$ git remote add joliveira_fork git@invent.kde.org:joliveira/okular.git
$ git remote -v
aacid_fork git@invent.kde.org:aacid/okular.git (fetch)
aacid_fork git@invent.kde.org:aacid/okular.git (push)
joliveira_fork git@invent.kde.org:joliveira/okular.git (fetch)
joliveira_fork git@invent.kde.org:joliveira/okular.git (push)
origin https://invent.kde.org/kde/okular.git (fetch)
origin https://invent.kde.org/kde/okular.git (push)
Notice how there are now multiple forks set up as remotes.
Next, you need to fetch all the repo metadata from the new remote:
git fetch joliveira_fork
This will download the list of branches. The next step is to switch to the one you want to collaborate on:
git checkout --track joliveira_fork/gsoc2019_numberFormat
This will create a local branch named "gsoc2019_numberFormat" from the contents of the remote branch joliveira_fork/gsoc2019_numberFormat and that also "tracks" it. This means that if someone else pushes changes to a remote version of that branch then you can run git pull --rebase while on your local "gsoc2019_numberFormat" branch to bring it up to date.
Next, make your changes, add and commit. Then push the changes to the remote joliveira_fork remote:
git push joliveira_fork gsoc2019_numberFormat
Generating "eternal" URLs to commits or objects in a repository
History has taught that no system used by KDE around the code repositories stays forever. Quickgit, CGit, Phabricator & Co. came and at one point were replaced while, sadly, also taking with them their service-specific URLs (and host names).
To give documentation, blog posts, commit messages, and other long-living documents a way to reference commits or objects in the repository, like directories or files at given branches or tags, the service commits.kde.org exists. It maps and forwards URLs to the respective current service URLs.
The pattern for URLs to commits is this:
https://commits.kde.org/<repo-id>/<commit-id>
Example:
https://commits.kde.org/kcoreaddons/d2f4d353327b322ee6bfcc303169190ae44393f0
The pattern for URLs to objects is like this:
https://commits.kde.org/<repo-id>[?[path=<pathToFileOrDirectory]&[branch=<branch>|tag=<tag>]]
<path> should be without a leading /. It defaults to the top-level directory if not set. Either a branch or tag can be passed at which the objects should be shown. It defaults to the main branch (master usually).
Examples:
https://commits.kde.org/kcoreaddons?path=src   # points to src/ directory in master branch
https://commits.kde.org/kcoreaddons?path=README.md&tag=v5.0.0   # points to README.md file at tag v5.0.0
https://commits.kde.org/kdelibs?path=kdecore/tests&branch=KDE/3.5   # points to kdecore/tests directory in branch KDE/3.5
There currently is no service to generate commit.kde.org URLs from URLs for the actual system. This has to be done manually.
Creating a merge request using the command line
GitLab supports git push options that can push your branch and create a merge request in one go. For example:
git push -o merge_request.create -o merge_request.target=master -o merge_request.remove_source_branch -o merge_request.assign=foo
replace foo with your actual user name. This command will push the branch, create a merge request, targeting the master branch, enable the "delete branch on merge" option, and assign the merge request to user foo.
You can change any of those parameters to suit your usage. For more details on GitLab push options see this.
If you have a branch with several commits, you'll most likely still need to tweak the merge request description, etc.
Of course, that's a lot to type, so it's easier to use a Git alias. For example this command will add an alias called push-mr to your Git config:
git config --global alias.push-mr 'push -o merge_request.create -o merge_request.target=master -o merge_request.remove_source_branch -o merge_request.assign=foo'
then you can use git push-mr like any other Git command. For more information about Git aliases see this


