KDEConnect/Build Windows: Difference between revisions
No edit summary |
No edit summary |
||
| Line 3: | Line 3: | ||
== SETTING UP ENVIRONMENT == | == SETTING UP ENVIRONMENT == | ||
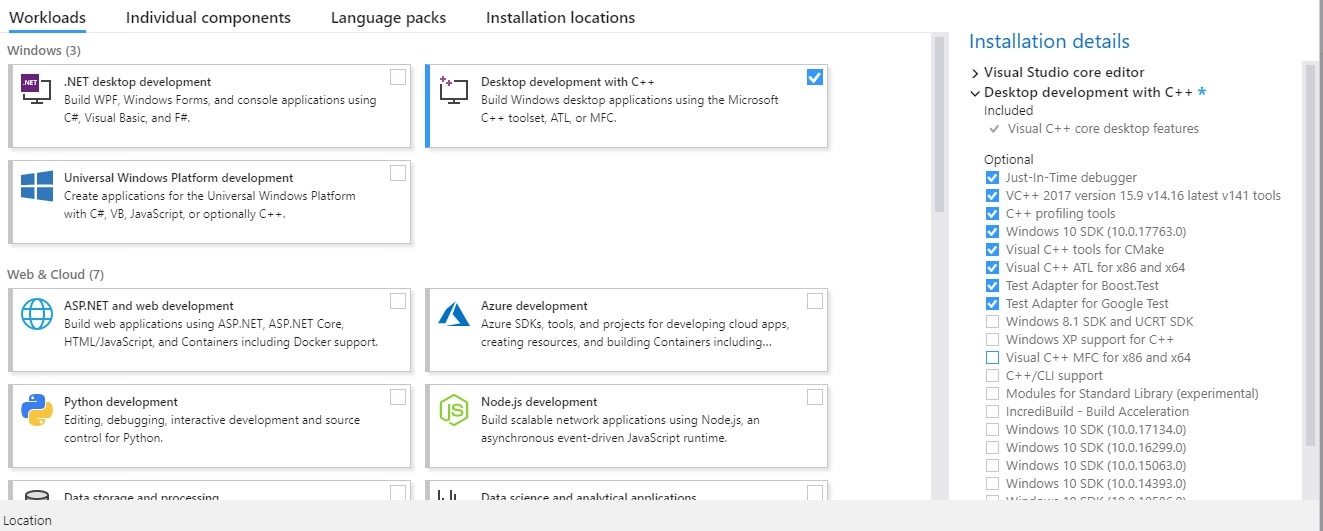
1. Install Visual Studio 2019 (Community) from [https://visualstudio.microsoft.com/downloads/ here] and select "Desktop development with C++". <br/> | |||
2. Install these packages. | |||
** Just-in-Time debugger | |||
** VC++ 2019 version | |||
** C++ profiling tools | |||
** Windows 10 SDK | |||
** Visual C++ tools for CMake | |||
** Visual C++ ATL for x86 and x64 | |||
** Test Adapter for Boost.Test | |||
** Test Adapter for Google Test | |||
[[File:kdeconnect_win01.jpeg | Select these components]] | [[File:kdeconnect_win01.jpeg | Select these components]] | ||
3. Call the following commands in a Powershell window with ''Administrator Privileges'' | |||
<pre>Set-ExecutionPolicy -Scope CurrentUser RemoteSigned | <pre> | ||
iex ((new-object net.webclient).DownloadString('https://raw.githubusercontent.com/KDE/craft/master/setup/install_craft. | Set-ExecutionPolicy -Scope CurrentUser RemoteSigned | ||
iex ((new-object net.webclient).DownloadString('https://raw.githubusercontent.com/KDE/craft/master/setup/install_craft. | |||
</pre> | </pre> | ||
4. During command 2, select the default ('''Visual Studio 17''') as your compiler! | |||
[[File:kdeconnect_win02.jpeg|INSTALLATION 1]] | |||
<pre>Select compiler | <pre>Select compiler | ||
[0] Mingw-w64, [1] Microsoft Visual Studio | [0] Mingw-w64, [1] Microsoft Visual Studio 2017, [2] Microsoft Visual Studio 2019 (default is Microsoft Visual Studio 2015): 1 | ||
Select architecture | Select architecture | ||
[0] x86 [1] x64 (Default is x64): 1 | [0] x86 [1] x64 (Default is x64): 1 | ||
</pre> | </pre> | ||
6. When installation is done, note the Environment variables to match the ones in top of this image:- | |||
[[File:kdeconnect_win03.jpeg|env vars]] | |||
<pre>[Environment] | <pre> | ||
[Environment] | |||
PATH= | PATH= | ||
| Line 53: | Line 51: | ||
Download directory : C:\CraftRoot\download | Download directory : C:\CraftRoot\download | ||
</pre> | </pre> | ||
== Getting the source code and building == | == Getting the source code and building == | ||
# Open '''Craft CraftRoot''' from search (in taskbar) | |||
# To get the latest source and start the building process: <code>craft extragear/kdeconnect-kde</code> | |||
== Building an installer == | == Building an installer == | ||
Revision as of 14:44, 30 August 2019
NOTE: This tutorial assumes Craft is being installed in C:/ [default]
SETTING UP ENVIRONMENT
1. Install Visual Studio 2019 (Community) from here and select "Desktop development with C++".
2. Install these packages.
- Just-in-Time debugger
- VC++ 2019 version
- C++ profiling tools
- Windows 10 SDK
- Visual C++ tools for CMake
- Visual C++ ATL for x86 and x64
- Test Adapter for Boost.Test
- Test Adapter for Google Test

3. Call the following commands in a Powershell window with Administrator Privileges
Set-ExecutionPolicy -Scope CurrentUser RemoteSigned
iex ((new-object net.webclient).DownloadString('https://raw.githubusercontent.com/KDE/craft/master/setup/install_craft.
4. During command 2, select the default (Visual Studio 17) as your compiler!

Select compiler
[0] Mingw-w64, [1] Microsoft Visual Studio 2017, [2] Microsoft Visual Studio 2019 (default is Microsoft Visual Studio 2015): 1
Select architecture
[0] x86 [1] x64 (Default is x64): 1
6. When installation is done, note the Environment variables to match the ones in top of this image:-

[Environment]
PATH=

Craft                             : C:\CraftRoot
Version                         : master
ABI                                : windows-msvc2017_64-c1
Download directory   : C:\CraftRoot\download
Getting the source code and building
- Open Craft CraftRoot from search (in taskbar)
- To get the latest source and start the building process:
craft extragear/kdeconnect-kde
Building an installer
- To create an installable setup, you need NSIS- a open source system to create Windows installers. Install it by this command:
craft nsis

- Now you can use the
--packageflag to build an installable .EXE out of latest source code available here. The command should look like this:craft --package extragear/kdeconnect-kde
Note the output file here:
Output: "C:\CraftRoot\tmp\kdeconnect-kde-master-86e5cd48-windows-msvc2017_64-cl.exe"
Great thanks to <TheOneRing_m> (Hannah) on IRC Freenode! She is the maintainer of KDE Craft, and a magician! 😄
SETTING UP ENVIRONMENT of MinGW environment (Experimental, Option)
- Call the following commands in a Powershell window with Administrator Privileges :-
Set-ExecutionPolicy -Scope CurrentUser RemoteSigned
iex ((new-object net.webclient).DownloadString('https://raw.githubusercontent.com/KDE/craft/master/setup/install_craft.ps1'))
- During command 2, feel free to select Mingw-w64 as your compiler!
Select compiler
[0] Mingw-w64, [1] Microsoft Visual Studio 2015, [2] Microsoft Visual Studio 2017 (default is Microsoft Visual Studio 2015): 0
Select architecture
[0] x86 [1] x64 (Default is x64): 1
Then there is no difference between this way and the one above.
Note that due to the lacking of some definitions in MinGW provided header file, system volume plugin could not be compiled with all functions on Windows using MinGW.
This feature is still an experimental feature.