Guidelines and HOWTOs/Icon Workflow Tips: Difference between revisions
(Create Icon Workflow Tips page) |
m (Move stylesheet background info to correct section) |
||
| (23 intermediate revisions by 2 users not shown) | |||
| Line 1: | Line 1: | ||
== | == Making icons == | ||
Make sure you have read https://hig.kde.org/style/icons/index.html | |||
=== Applications === | |||
Don't use proprietary software like Adobe Illustrator, Gravit Designer or Figma. All of our icons are made with Inkscape, but as long as your SVG editor is free, open source, compatible with Inkscape and compatible with the Qt SVG renderer, it should be OK to use. | |||
=== Canvas === | |||
Make sure you always use a canvas that matches the size you're using for the icon (e.g., 48x48 px instead of 210x297 mm). In Inkscape, you can change the canvas size by going to <menuchoice>File -> Document Properties...</menuchoice> or <keycap>Ctrl + Shift + D</keycap> | |||
=== Grid === | |||
A grid can be extremely useful for making icons that appear sharp instead of blurry or faded. When making icons, a grid with 1 px of space between each line is generally ideal. In Inkscape, you can modify the grid settings by going to <menuchoice>File -> Document Properties... -> Grids</menuchoice>. You can toggle the grid on and off with <keycap>Shift + 3</keycap> (US Keyboard layout) or <keycap>#</keycap>. | |||
If you are making strokes with the Line tool in Inkscape (<keycap>Shift + F6</keycap>), it is useful to use a spacing of 0.5 px and a major grid line every 2 lines. Strokes are centered on the points where you create them, so they would appear between pixels if you used a 1px grid spacing. | |||
=== Drawing Techniques === | |||
==== General Tips ==== | |||
* Always convert strokes to paths. Strokes don't always show up correctly in various SVG renderers, including the Qt SVG renderer. In Inkscape, the shortcut to convert a stroke to a path is <keycap>Ctrl + Alt + C</keycap>. | |||
==== Diagonal lines ==== | |||
The best way to get a 1px thick pixel perfect diagonal line is use strokes, line up the end points with the grid diagonally, place end points in the center of pixels, and enable end caps. Avoid snapping the sides of the line to the grid, although it is acceptable with some difficult to make shapes. | |||
See the pictures below: | |||
[[File:Diagonal 1px line style.png|center|frame|Left: wrong, Right: correct]] | |||
The image above at 1x size: | |||
[[File:Diagonal 1px line style 100%.png|left|none|The image above at 1x size]] | |||
* Notice that the incorrect style looks thicker and fuzzier than the vertical and horizontal lines while the correct style is more crisp and similar in thickness to the vertical and horizontal lines. | |||
== SVG optimization == | == SVG optimization == | ||
In general, SVGs should be optimized and automatically formatted. This makes them compact, easier to read and easier to manually edit (when necessary). There are multiple methods that can be used to optimize an SVG. | |||
=== Inkscape: Optimized SVG format === | |||
This option does not strip embedded stylesheets, but saving in Inkscape always adds hardcoded colors to modified parts of the SVG. Remember to fix the hardcoded colors. | |||
<menuchoice>File -> Save As...</menuchoice> or <keycap>Ctrl + Shift + S</keycap> | |||
Set the file type to <menuchoice>Optimized SVG (*.svg)</menuchoice> | |||
Use these settings: | |||
<gallery> | |||
Inkscape Optimized SVG dialog - Options page.png|Options | |||
Inkscape Optimized SVG dialog - SVG Output page.png|SVG Output | |||
Inkscape Optimized SVG dialog - IDs page.png|IDs | |||
</gallery> | |||
=== Scour === | === Scour === | ||
| Line 26: | Line 61: | ||
Put this somewhere that will be loaded by your shell: | Put this somewhere that will be loaded by your shell: | ||
<syntaxhighlight lang="Bash"> | {{Input|<syntaxhighlight lang="Bash"> | ||
# For optimizing SVGs in the Breeze icon theme | |||
function scour-icon { | |||
# Use this for icons from breeze-icons | |||
scour --set-precision=8 --enable-viewboxing --enable-comment-stripping --remove-descriptive-elements --create-groups --strip-xml-space --strip-xml-prolog --nindent=4 $1 output.svg | |||
mv output.svg $1 | |||
} | |||
For | # For optimizing SVGs in the the Plasma theme | ||
function scour-theme { | |||
scour --set-precision=8 --enable-viewboxing --enable-comment-stripping --remove-descriptive-elements --strip-xml-space --strip-xml-prolog --nindent=4 $1 output.svg | |||
mv output.svg $1 | |||
} | |||
</syntaxhighlight>}} | |||
Usage: | |||
< | {{Input|1=<nowiki> | ||
scour- | cd [path to directory containing icon] | ||
scour-icon [icon name] | |||
</ | </nowiki>}} | ||
=== SVG Cleaner === | === SVG Cleaner === | ||
| Line 50: | Line 88: | ||
* https://github.com/RazrFalcon/svgcleaner-gui | * https://github.com/RazrFalcon/svgcleaner-gui | ||
Available in fewer distros, but it has a GUI if you prefer that. The package name is usually <code>svgcleaner</code> (for the CLI tool) or <code>svgcleaner-gui</code> (for the GUI). Always double check the positions of your gradients in Inkscape if you use this program. It will always strip embedded stylesheets, so if your | Available in fewer distros, but it has a GUI if you prefer that. The package name is usually <code>svgcleaner</code> (for the CLI tool) or <code>svgcleaner-gui</code> (for the GUI). Always double check the positions of your gradients in Inkscape if you use this program. It will always strip embedded stylesheets, so if your SVG is supposed to have stylesheets, add those last. Do not use for desktop themes. | ||
Usage: | |||
< | {{Input|1=<nowiki> | ||
svgcleaner icon-name.svg icon-name.svg --indent=4 --allow-bigger-file | svgcleaner icon-name.svg icon-name.svg --indent=4 --allow-bigger-file | ||
</ | </nowiki>}} | ||
=== SVGO === | === SVGO === | ||
| Line 70: | Line 102: | ||
Currently available in no distro repositories, but you can install it from Node Package Manager (<code>npm</code>) with this: | Currently available in no distro repositories, but you can install it from Node Package Manager (<code>npm</code>) with this: | ||
< | {{Input|1=<nowiki> | ||
sudo npm install -g svgo | sudo npm install -g svgo | ||
</ | </nowiki>}} | ||
SVGO can be set to preserve stylesheets, but it will still strip <code>type="text/css"</code>, which is wrong. This command will strip stylesheets, so add those last. Do not use for desktop themes. | |||
Usage: | |||
< | {{Input|1=<nowiki> | ||
svgo --pretty icon-name.svg | svgo --pretty icon-name.svg | ||
</ | </nowiki>}} | ||
=== Misc comments about SVG optimizers === | === Misc comments about SVG optimizers === | ||
If you combine them, you can get a more thorough cleaning. I usually use SVG Cleaner and then SVGO. Scour doesn't do as good of a job for color icons, which often require more cleaning to get the size down. However, it's nice when you're editing existing monochrome icons because it doesn't strip the stylesheets. | If you combine them, you can get a more thorough cleaning. I usually use SVG Cleaner and then SVGO for icons. Scour doesn't do as good of a job for color icons, which often require more cleaning to get the size down. However, it's nice when you're editing existing monochrome icons because it doesn't strip the stylesheets. | ||
== Embedding stylesheets in SVGs == | == Embedding stylesheets in SVGs == | ||
| Line 96: | Line 122: | ||
Put this somewhere that will be loaded by your shell: | Put this somewhere that will be loaded by your shell: | ||
<syntaxhighlight lang="Bash"> | {{Input|<syntaxhighlight lang="Bash"> | ||
#These will replace hardcoded colors with the appropriate class and currentColor fill for stylesheet compatibility | #These will replace hardcoded colors with the appropriate class and currentColor fill for stylesheet compatibility | ||
# Made for people who do Breeze 1st and Breeze Dark 2nd | # Made for people who do Breeze 1st and Breeze Dark 2nd | ||
| Line 103: | Line 129: | ||
alias sed-Background="sed --follow-symlinks -i 's/fill=\"#eff0f1\"/class=\"ColorScheme-Background\" fill=\"currentColor\"/'" | alias sed-Background="sed --follow-symlinks -i 's/fill=\"#eff0f1\"/class=\"ColorScheme-Background\" fill=\"currentColor\"/'" | ||
alias sed-ViewBackground="sed --follow-symlinks -i 's/fill=\"#fcfcfc\"/class=\"ColorScheme-ViewBackground\" fill=\"currentColor\"/'" | alias sed-ViewBackground="sed --follow-symlinks -i 's/fill=\"#fcfcfc\"/class=\"ColorScheme-ViewBackground\" fill=\"currentColor\"/'" | ||
alias sed- | alias sed-ButtonFocus="sed --follow-symlinks -i 's/fill=\"#3daee9\"/class=\"ColorScheme-ButtonFocus\" fill=\"currentColor\"/'" | ||
alias sed-PositiveText="sed --follow-symlinks -i 's/fill=\"#27ae60\"/class=\"ColorScheme-PositiveText\" fill=\"currentColor\"/'" | alias sed-PositiveText="sed --follow-symlinks -i 's/fill=\"#27ae60\"/class=\"ColorScheme-PositiveText\" fill=\"currentColor\"/'" | ||
alias sed-NeutralText="sed --follow-symlinks -i 's/fill=\"#f67400\"/class=\"ColorScheme-NeutralText\" fill=\"currentColor\"/'" | alias sed-NeutralText="sed --follow-symlinks -i 's/fill=\"#f67400\"/class=\"ColorScheme-NeutralText\" fill=\"currentColor\"/'" | ||
| Line 112: | Line 138: | ||
# Convert Breeze Dark icon with stylesheet to Breeze. ColorScheme-Text only | # Convert Breeze Dark icon with stylesheet to Breeze. ColorScheme-Text only | ||
alias sed-breeze="sed --follow-symlinks -i 's/color:#eff0f1/color:#232629/'" | alias sed-breeze="sed --follow-symlinks -i 's/color:#eff0f1/color:#232629/'" | ||
</syntaxhighlight> | </syntaxhighlight>}} | ||
Usage: | Usage: | ||
< | {{Input|1=<nowiki> | ||
sed-Text an-icon.svg | sed-Text an-icon.svg | ||
sed-Text *wild*cards*work* | sed-Text *wild*cards*work* | ||
</ | </nowiki>}} | ||
=== Stylesheets === | === Stylesheets === | ||
| Line 127: | Line 153: | ||
Most monochrome icons will only need this much: | Most monochrome icons will only need this much: | ||
<syntaxhighlight lang="XML"> | {{Input|<syntaxhighlight lang="XML"> | ||
<style | <style type="text/css" id="current-color-scheme"> | ||
.ColorScheme-Text { | .ColorScheme-Text { | ||
color:#232629; | color:#232629; | ||
} | } | ||
</style> | </style> | ||
</syntaxhighlight> | </syntaxhighlight>}} | ||
==== Breeze ==== | ==== Breeze ==== | ||
<syntaxhighlight lang="XML"> | {{Input|<syntaxhighlight lang="XML"> | ||
<style | <style type="text/css" id="current-color-scheme"> | ||
.ColorScheme-Text { | .ColorScheme-Text { | ||
color:#232629; | color:#232629; | ||
| Line 152: | Line 174: | ||
color:#fcfcfc; | color:#fcfcfc; | ||
} | } | ||
.ColorScheme- | .ColorScheme-ButtonFocus { | ||
color:#3daee9; | color:#3daee9; | ||
} | } | ||
| Line 165: | Line 187: | ||
} | } | ||
</style> | </style> | ||
</syntaxhighlight> | </syntaxhighlight>}} | ||
==== Breeze Dark ==== | ==== Breeze Dark ==== | ||
<syntaxhighlight lang="XML"> | {{Input|<syntaxhighlight lang="XML"> | ||
<style | <style type="text/css" id="current-color-scheme"> | ||
.ColorScheme-Text { | .ColorScheme-Text { | ||
color:#eff0f1; | color:#eff0f1; | ||
| Line 182: | Line 202: | ||
color:#232629; | color:#232629; | ||
} | } | ||
.ColorScheme- | .ColorScheme-ButtonFocus { | ||
color:#3daee9; | color:#3daee9; | ||
} | } | ||
| Line 195: | Line 215: | ||
} | } | ||
</style> | </style> | ||
</syntaxhighlight> | </syntaxhighlight>}} | ||
The only differences are Text, Background and ViewBackground. | The only differences are Text, Background and ViewBackground. | ||
For background information, see http://notmart.org/blog/2016/05/icon-colors/ | |||
== Icon compilation images == | |||
<code>montage</code> can be used to make compilations of all your icons quickly. The package name is usually <code>ImageMagick</code> or <code>imagemagick</code>. | |||
Put this somewhere that will be loaded by your shell: | |||
{{Input|<syntaxhighlight lang="Bash"> | |||
alias montage-breeze="montage -density 96x96 -fill '#232629' -label '%t' -background '#eff0f1'" # Background color | |||
alias montage-breeze2="montage -density 96x96 -fill '#232629' -label '%t' -background '#fcfcfc'" # ViewBackground color | |||
alias montage-breeze-dark="montage -density 96x96 -fill '#eff0f1' -label '%t' -background '#31363b'" # Background color | |||
alias montage-breeze-dark2="montage -density 96x96 -fill '#eff0f1' -label '%t' -background '#232629'" # ViewBackground color | |||
</syntaxhighlight>}} | |||
Usage: | |||
{{Input|1=<nowiki> | |||
montage-breeze an-icon-here.svg ../an-icon-up-there.svg ../*/*wild*cards*work* montage-breeze-Background.png # The PNG at the end is the image that the command will create | |||
</nowiki>}} | |||
Revision as of 00:16, 11 September 2019
Making icons
Make sure you have read https://hig.kde.org/style/icons/index.html
Applications
Don't use proprietary software like Adobe Illustrator, Gravit Designer or Figma. All of our icons are made with Inkscape, but as long as your SVG editor is free, open source, compatible with Inkscape and compatible with the Qt SVG renderer, it should be OK to use.
Canvas
Make sure you always use a canvas that matches the size you're using for the icon (e.g., 48x48 px instead of 210x297 mm). In Inkscape, you can change the canvas size by going to or Ctrl + Shift + D
Grid
A grid can be extremely useful for making icons that appear sharp instead of blurry or faded. When making icons, a grid with 1 px of space between each line is generally ideal. In Inkscape, you can modify the grid settings by going to . You can toggle the grid on and off with Shift + 3 (US Keyboard layout) or #.
If you are making strokes with the Line tool in Inkscape (Shift + F6), it is useful to use a spacing of 0.5 px and a major grid line every 2 lines. Strokes are centered on the points where you create them, so they would appear between pixels if you used a 1px grid spacing.
Drawing Techniques
General Tips
- Always convert strokes to paths. Strokes don't always show up correctly in various SVG renderers, including the Qt SVG renderer. In Inkscape, the shortcut to convert a stroke to a path is Ctrl + Alt + C.
Diagonal lines
The best way to get a 1px thick pixel perfect diagonal line is use strokes, line up the end points with the grid diagonally, place end points in the center of pixels, and enable end caps. Avoid snapping the sides of the line to the grid, although it is acceptable with some difficult to make shapes.
See the pictures below:
The image above at 1x size:

- Notice that the incorrect style looks thicker and fuzzier than the vertical and horizontal lines while the correct style is more crisp and similar in thickness to the vertical and horizontal lines.
SVG optimization
In general, SVGs should be optimized and automatically formatted. This makes them compact, easier to read and easier to manually edit (when necessary). There are multiple methods that can be used to optimize an SVG.
Inkscape: Optimized SVG format
This option does not strip embedded stylesheets, but saving in Inkscape always adds hardcoded colors to modified parts of the SVG. Remember to fix the hardcoded colors.
or Ctrl + Shift + S
Set the file type to
Use these settings:
-
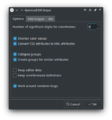
Options
-
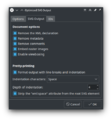
SVG Output
-
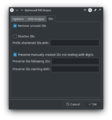
IDs


Scour
scour is available in many Linux distribution repositories. The package name is usually scour or python-scour.
Put this somewhere that will be loaded by your shell:
# For optimizing SVGs in the Breeze icon theme
function scour-icon {
    # Use this for icons from breeze-icons
    scour --set-precision=8 --enable-viewboxing --enable-comment-stripping --remove-descriptive-elements --create-groups --strip-xml-space --strip-xml-prolog --nindent=4 $1 output.svg
    mv output.svg $1
}

# For optimizing SVGs in the the Plasma theme
function scour-theme {
    scour --set-precision=8 --enable-viewboxing --enable-comment-stripping --remove-descriptive-elements --strip-xml-space --strip-xml-prolog --nindent=4 $1 output.svg
    mv output.svg $1
}
Usage:
cd [path to directory containing icon]
scour-icon [icon name]
SVG Cleaner
Available in fewer distros, but it has a GUI if you prefer that. The package name is usually svgcleaner (for the CLI tool) or svgcleaner-gui (for the GUI). Always double check the positions of your gradients in Inkscape if you use this program. It will always strip embedded stylesheets, so if your SVG is supposed to have stylesheets, add those last. Do not use for desktop themes.
Usage:
svgcleaner icon-name.svg icon-name.svg --indent=4 --allow-bigger-file
SVGO
Currently available in no distro repositories, but you can install it from Node Package Manager (npm) with this:
sudo npm install -g svgo
SVGO can be set to preserve stylesheets, but it will still strip type="text/css", which is wrong. This command will strip stylesheets, so add those last. Do not use for desktop themes.
Usage:
svgo --pretty icon-name.svg
Misc comments about SVG optimizers
If you combine them, you can get a more thorough cleaning. I usually use SVG Cleaner and then SVGO for icons. Scour doesn't do as good of a job for color icons, which often require more cleaning to get the size down. However, it's nice when you're editing existing monochrome icons because it doesn't strip the stylesheets.
Embedding stylesheets in SVGs
Put this somewhere that will be loaded by your shell:
#These will replace hardcoded colors with the appropriate class and currentColor fill for stylesheet compatibility
# Made for people who do Breeze 1st and Breeze Dark 2nd
# You still need to add stylesheets
alias sed-Text="sed --follow-symlinks -i 's/fill=\"#232629\"/class=\"ColorScheme-Text\" fill=\"currentColor\"/'"
alias sed-Background="sed --follow-symlinks -i 's/fill=\"#eff0f1\"/class=\"ColorScheme-Background\" fill=\"currentColor\"/'"
alias sed-ViewBackground="sed --follow-symlinks -i 's/fill=\"#fcfcfc\"/class=\"ColorScheme-ViewBackground\" fill=\"currentColor\"/'"
alias sed-ButtonFocus="sed --follow-symlinks -i 's/fill=\"#3daee9\"/class=\"ColorScheme-ButtonFocus\" fill=\"currentColor\"/'"
alias sed-PositiveText="sed --follow-symlinks -i 's/fill=\"#27ae60\"/class=\"ColorScheme-PositiveText\" fill=\"currentColor\"/'"
alias sed-NeutralText="sed --follow-symlinks -i 's/fill=\"#f67400\"/class=\"ColorScheme-NeutralText\" fill=\"currentColor\"/'"
alias sed-NegativeText="sed --follow-symlinks -i 's/fill=\"#da4453\"/class=\"ColorScheme-NegativeText\" fill=\"currentColor\"/'"

# Convert Breeze icon with stylesheet to Breeze Dark. ColorScheme-Text only
alias sed-breeze-dark="sed --follow-symlinks -i 's/color:#232629/color:#eff0f1/'"
# Convert Breeze Dark icon with stylesheet to Breeze. ColorScheme-Text only
alias sed-breeze="sed --follow-symlinks -i 's/color:#eff0f1/color:#232629/'"
Usage:
sed-Text an-icon.svg
sed-Text *wild*cards*work*
Stylesheets
Only include the color classes you will actually use.
Most monochrome icons will only need this much:
    <style type="text/css" id="current-color-scheme">
        .ColorScheme-Text {
            color:#232629;
        }
    </style>
Breeze
    <style type="text/css" id="current-color-scheme">
        .ColorScheme-Text {
            color:#232629;
        }
        .ColorScheme-Background {
            color:#eff0f1;
        }
        .ColorScheme-ViewBackground {
            color:#fcfcfc;
        }
        .ColorScheme-ButtonFocus {
            color:#3daee9;
        }
        .ColorScheme-PositiveText {
            color:#27ae60;
        }
        .ColorScheme-NeutralText {
            color:#f67400;
        }
        .ColorScheme-NegativeText {
            color:#da4453;
        }
    </style>
Breeze Dark
    <style type="text/css" id="current-color-scheme">
        .ColorScheme-Text {
            color:#eff0f1;
        }
        .ColorScheme-Background {
            color:#31363b;
        }
        .ColorScheme-ViewBackground {
            color:#232629;
        }
        .ColorScheme-ButtonFocus {
            color:#3daee9;
        }
        .ColorScheme-PositiveText {
            color:#27ae60;
        }
        .ColorScheme-NeutralText {
            color:#f67400;
        }
        .ColorScheme-NegativeText {
            color:#da4453;
        }
    </style>
The only differences are Text, Background and ViewBackground.
For background information, see http://notmart.org/blog/2016/05/icon-colors/
Icon compilation images
montage can be used to make compilations of all your icons quickly. The package name is usually ImageMagick or imagemagick.
Put this somewhere that will be loaded by your shell:
alias montage-breeze="montage -density 96x96 -fill '#232629' -label '%t' -background '#eff0f1'" # Background color
alias montage-breeze2="montage -density 96x96 -fill '#232629' -label '%t' -background '#fcfcfc'" # ViewBackground color
alias montage-breeze-dark="montage -density 96x96 -fill '#eff0f1' -label '%t' -background '#31363b'" # Background color
alias montage-breeze-dark2="montage -density 96x96 -fill '#eff0f1' -label '%t' -background '#232629'" # ViewBackground color
Usage:
montage-breeze an-icon-here.svg ../an-icon-up-there.svg ../*/*wild*cards*work* montage-breeze-Background.png # The PNG at the end is the image that the command will create