Selenium
GUI Testing with selenium-webdriver-at-spi
Glossary
| Term | Explanation |
|---|---|
| Selenium | A browser automation framework |
| Driver | The server component of Selenium |
| Appium | An extension to Selenium making it more useful for app testing |
| AT-SPI2 | A protocol over DBus, which GUI toolkit widgets use to provide their content to screen readers |
Installing Dependencies
Basic understanding of how to use meson, cmake, autotools, and make to build and install software is expected.
Distribution-specific instructions
If your distribution is listed below, just install the listed packages.
| Distribution | Install command |
|---|---|
| openSUSE Tumbleweed |
|
| Kubuntu/neon |
|
|
|
|---|
| For Kubuntu/Ubuntu users: 22.04 LTS version doesn't support all the packages and further steps will fail. It’s recommended to switch to a higher version (23.xx). |
General-purpose instructions
Otherwise, manually install the following dependencies:
- A supported
python3version (at the time of writing >=3.7) - https://gitlab.gnome.org/GNOME/at-spi2-core
- https://gitlab.gnome.org/GNOME/pyatspi2
- https://gitlab.gnome.org/GNOME/accerciser
- https://gitlab.gnome.org/GNOME/gobject-introspection
Installing selenium-webdriver-at-spi
git clone https://invent.kde.org/sdk/selenium-webdriver-at-spi.git
cd selenium-webdriver-at-spi
pip3 install -r requirements.txt
echo export PATH="~/.local/bin:$PATH" >> ${HOME}/.bashrc
mkdir build
cd build
cmake ..
make
sudo make install
cd ..
Writing Tests
You can write tests in any language you want. For the purposes of this guide we are going to use Python in the hopes that most readers are familiar enough with that language. The complete source code is available here.
We start off by creating our test class:
import unittest
from appium import webdriver
from appium.webdriver.common.appiumby import AppiumBy
import selenium.common.exceptions
from selenium.webdriver.support.ui import WebDriverWait

class SimpleCalculatorTests(unittest.TestCase):
    pass

if __name__ == '__main__':
    suite = unittest.TestLoader().loadTestsFromTestCase(SimpleCalculatorTests)
    unittest.TextTestRunner(verbosity=2).run(suite)
Next, we’ll define some boilerplate setup logic:
    @classmethod
    def setUpClass(self):
        desired_caps = {}
        # The app capability may be a command line or a desktop file id.
        desired_caps["app"] = "org.kde.kcalc.desktop"
        # Boilerplate, always the same
        self.driver = webdriver.Remote(
            command_executor='http://127.0.0.1:4723',
            desired_capabilities=desired_caps)
        # Set a timeout for waiting to find elements. If elements cannot be found
        # in time we'll get a test failure. This should be somewhat long so as to
        # not fall over when the system is under load, but also not too long that
        # the test takes forever.
        self.driver.implicitly_wait = 10

    @classmethod
    def tearDownClass(self):
        # Make sure to terminate the driver again, lest it dangles.
        self.driver.quit()
This will start the app org.kde.kcalc.desktop through its desktop file, and expect that it correctly set its desktop file id on the window as well - when not dealing with a proper GUI app you may want to use another startup method: You can also pass command lines to instead fork a process manually. For example you might start a Plasma applet with "plasmawindowed org.kde.plasma.calculator". Valid app startup options are:
| Option | Example | Explanation |
|---|---|---|
| desktop file id | desired_caps["app"] = "org.kde.kcalc.desktop"
|
The app will be started by its desktop file name similar to how plasma would start it |
| command line | desired_caps["app"] = "plasmawindowed org.kde.plasma.calculator"
|
The app will be fork()ed off without any expectation of having desktop file ids available |
| pid | desired_caps["app"] = "12356"
|
You are in charge of starting the app and pass the pid in. please note that you are in charge of ensuring that this pid actually terminates properly once your test is done! |
Let’s write our first test case. A simple addition should do. To write Selenium tests we need to tell the driver to find specific UI elements and interact with them (e.g. click them). There are a number of options for finding elements based on at-spi properties:
| Option | Example | Explanation |
|---|---|---|
| name | self.driver.find_element(by=AppiumBy.NAME, value="AC")
|
|
| description | self.driver.find_element(by='description', value="Result Display")
|
|
| accessibility id | self.driver.find_element(by=AppiumBy.ACCESSIBILITY_ID, value="QGuiApplication.QQuickWindow_QML_28.developerPage")
|
The ID is constructed from objectNames and the object tree. The id is matched from the end (e.g. in the example value=“developerPage” would also match). On the QML side you can also set an objectName when you need to find an Item by its id rather than name or description; Mind that this requires a Qt 5 Patch Collection build to work correctly. |
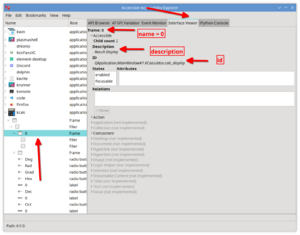
| class name | AC]") | The class name is comprised of the type and name , you can easily find this identifier in Accerciser’s API Browser tab (combobox might need changing away from the “Accessible”).
|
| xpath | //dialog[@name="Duplicate?"]//push_button[@name="Yes"]
|
Based on an XML representation of the object tree. The xml may be accessed via http://127.0.0.1:4723/session/$$SESSION-UUID$$/sourceRaw . http://xpather.com/ is a useful tool to test xpath queries. |
To figure out what to actually look for we can look at at-spi directly. To do this we’ll use the tool “Accerciser”. On the left hand side you can navigate the various accessible elements of currently opened applications. On the right hand side you can inspect the element. The most pertinent tab here is ‘Interface Viewer’, it let’s us find most of the locator types as well as inspect interaction options we have in the “Action” group and state assertion options in the “States” list view.

Let’s sketch out a simple addition test:
    def test_addition(self):
        self.driver.find_element(by=AppiumBy.NAME, value="1").click()
        self.driver.find_element(by=AppiumBy.NAME, value="+").click()
        self.driver.find_element(by=AppiumBy.NAME, value="7").click()
        self.driver.find_element(by=AppiumBy.NAME, value="=").click()
1+7=8. Easy enough. We’ll have to replicate the interaction with the UI. We need to click the numbers and actions in order. For simplicity we’ll find the elements by name, but be mindful that finding by name can easily be ambiguous (e.g. in kcalc’s specific case the result display may have the same name as a button). When ambiguity is a possibility it’s generally a better idea to use one of the other locator strategies.
Lastly we’ll find the result display element, obtain its text property, and assert it being 8:
        displaytext = self.driver.find_element(by='description', value="Result Display").text
        self.assertEqual(displaytext, "8")
Running Tests
We now have our first test completed. To run this test we’ll simply execute it through the test runner like this:
selenium-webdriver-at-spi-run examples/calculatortest.py
The run wrapper makes sure the server side components are correctly started and shut down as necessary; it must be used for things to work correctly!
When working on an existing code base, running tests is best done through cmake respectively ctest. For boiler plate logic see this example.
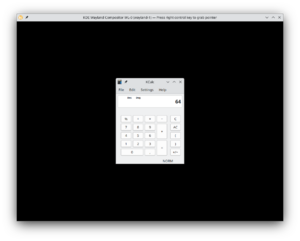
A Wayland compositor window opens and the test cases are executed sequentially:

Afterwards, the console output should show that the tests succeeded:
----------------------------------------------------------------------
Ran 6 tests in 38.490s

OK
kwin_wayland_backend: Destroyed Wayland display
