Ocs-server/Install/First run wizard: Difference between revisions
| (6 intermediate revisions by the same user not shown) | |||
| Line 1: | Line 1: | ||
== Where to start == | == Where to start == | ||
In order to follow this tutorial, you should have completed the [[Ocs-server/Install/Configuring a webserver as host| Configuring a webserver as host]] tutorial, and therefore having a configured webserver and a copy of ocs-server installed and working. You should see a welcoming page if you go on your local domain like [http://localhost http://localhost]. | In order to follow this tutorial, you should have completed the [[Ocs-server/Install/Configuring a webserver as host| Configuring a webserver as host]] tutorial, and therefore having a configured webserver and a copy of ocs-server installed and working. You should see a welcoming page if you go on your local domain like [http://localhost http://localhost]. | ||
If you don't see the welcoming page, make sure no '''index.html''' is present in the root of your web server. If your system is a standard *buntu installation, you can delete the standard index page by doing: | |||
<syntaxhighlight lang="php"> | |||
sudo rm /var/www/html/index.html | |||
</syntaxhighlight> | |||
Then, check again: [http://localhost http://localhost]. | |||
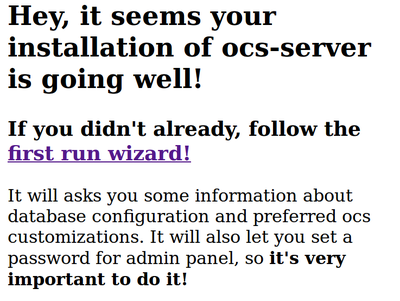
On this page follow the link that point to the "First run wizard". | On this page follow the link that point to the "First run wizard". | ||
[[File:Ocs_firstrun.png|400px|thumb|center|Press on "first run wizard!"]] | [[File:Ocs_firstrun.png|400px|thumb|center|Press on "first run wizard!"]] | ||
== Step 1: configuring database == | |||
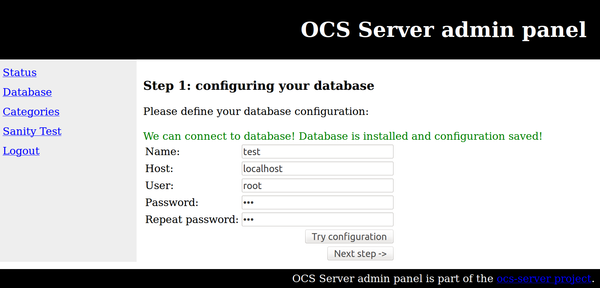
The first run wizard will ask you for a valid database configuration. You have to provide the name of the database, the host in which is located, user and password used for the connection, of an already installed MySQL server. You can try your config with the "Try config" button until a green text will appear saying that a successful connection has been made. | |||
On this page follow the link that point to the "First run wizard". | |||
[[File:Ocs_step1.png|600px|thumb|center|Everything is fine here]] | |||
== Step 2: configuring OCS parameters == | |||
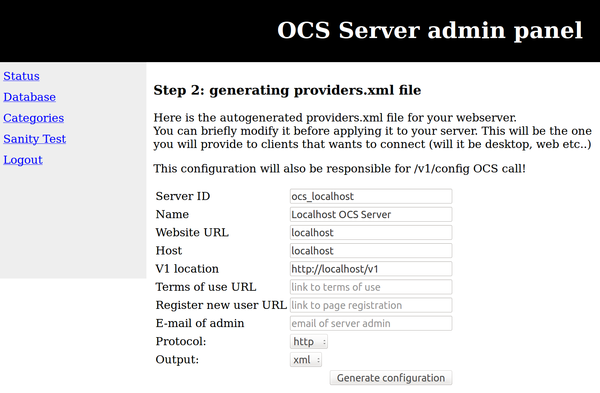
The second step is about configuring pure OCS parameters. Since there is no clear explanation about those parameters on the internet we'll try to explain here one by one: | |||
* Server ID: just affects client's libraries, it's the name that will be shown when connecting. | |||
* Name: same as Server ID | |||
* Website: shown as the website that contains the api. e.g. opendesktop.org | |||
* Host: the actual host of the OCS api: e.g. host.opendesktop.org (without /v1) | |||
* V1 location: the complete location of the basic OCS call. This would be for example: http://host.opendesktop.org/v1 . This is the base for every query made by the client. For example to retrieve all the content the call will be http://host.opendesktop.org/v1/content/data . | |||
* Terms of use URL: human readable terms of use. There is no format restriction on these. You can point that to a webpage or to a pdf, still we encourage to use html or txt format. | |||
* Register new user URL: This is optional and it's the URL that points to the human-readable webpage that let a new user to be registered on your OCS server. Take in account that, as described in the protocol specs, new users can also register using OCS calls from every client. | |||
* E-mail of admin: the system administrator email | |||
* Protocol: choose between http and https. Changing this won't install and configure the SSL module on the webserver for you, so be sure to select the appropriate entry for your configuration. | |||
* Output: choose between responding to client in XML or JSON. We're working on the possibility to having both of them. | |||
This will generate a file called providers.xml that will provide clients with all the information needed to query your server, so be careful on this part. | |||
[[File:Ocs_step2.png|600px|thumb|center|Automatic configurator in action]] | |||
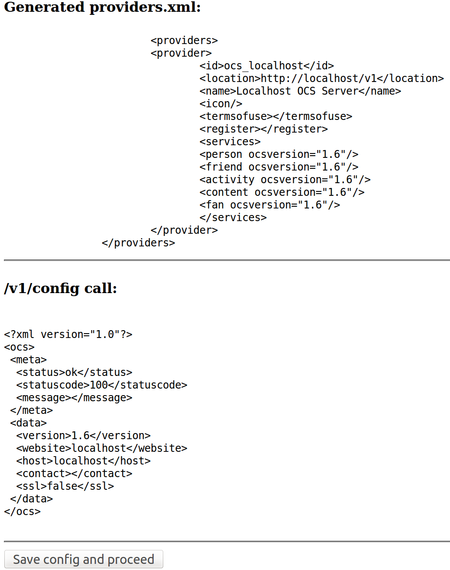
Then a quick preview of the providers.xml file will be generated. A preview of the /v1/config call also is available. If you see a nice XML formatted output with /v1/config it means your server is now working properly. | |||
[[File:Ocs_step2_1.png|450px|thumb|center|Previews of config]] | |||
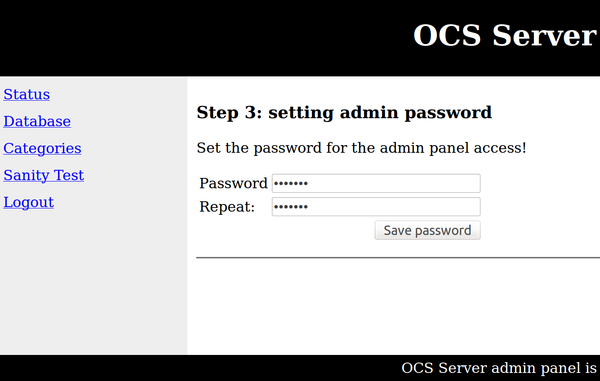
== Step 3: setting admin password == | |||
The last part of the tutorial will ask you to set an admin password, that will be asked everytime you'll try to access the admin area via http://example.com/admin . For more security, you can also erase the "admin" folder entirely and put it there just when needed, or restricts that folder the be accessible only from localhost and so on. | |||
[[File:Ocs_step3.png|600px|thumb|center|Set your admin password]] | |||
== Conclusions == | |||
Here we are, you should have your OCS server up and running now! You can use it with any kind of client that supports OCS. We built a webclient sized to KDE's needs that you're free to use, modify and adapt. | |||
Latest revision as of 14:35, 1 October 2015
Where to start
In order to follow this tutorial, you should have completed the Configuring a webserver as host tutorial, and therefore having a configured webserver and a copy of ocs-server installed and working. You should see a welcoming page if you go on your local domain like http://localhost.
If you don't see the welcoming page, make sure no index.html is present in the root of your web server. If your system is a standard *buntu installation, you can delete the standard index page by doing:
sudo rm /var/www/html/index.html
Then, check again: http://localhost.
On this page follow the link that point to the "First run wizard".
Step 1: configuring database
The first run wizard will ask you for a valid database configuration. You have to provide the name of the database, the host in which is located, user and password used for the connection, of an already installed MySQL server. You can try your config with the "Try config" button until a green text will appear saying that a successful connection has been made. On this page follow the link that point to the "First run wizard".
Step 2: configuring OCS parameters
The second step is about configuring pure OCS parameters. Since there is no clear explanation about those parameters on the internet we'll try to explain here one by one:
- Server ID: just affects client's libraries, it's the name that will be shown when connecting.
- Name: same as Server ID
- Website: shown as the website that contains the api. e.g. opendesktop.org
- Host: the actual host of the OCS api: e.g. host.opendesktop.org (without /v1)
- V1 location: the complete location of the basic OCS call. This would be for example: http://host.opendesktop.org/v1 . This is the base for every query made by the client. For example to retrieve all the content the call will be http://host.opendesktop.org/v1/content/data .
- Terms of use URL: human readable terms of use. There is no format restriction on these. You can point that to a webpage or to a pdf, still we encourage to use html or txt format.
- Register new user URL: This is optional and it's the URL that points to the human-readable webpage that let a new user to be registered on your OCS server. Take in account that, as described in the protocol specs, new users can also register using OCS calls from every client.
- E-mail of admin: the system administrator email
- Protocol: choose between http and https. Changing this won't install and configure the SSL module on the webserver for you, so be sure to select the appropriate entry for your configuration.
- Output: choose between responding to client in XML or JSON. We're working on the possibility to having both of them.
This will generate a file called providers.xml that will provide clients with all the information needed to query your server, so be careful on this part.
Then a quick preview of the providers.xml file will be generated. A preview of the /v1/config call also is available. If you see a nice XML formatted output with /v1/config it means your server is now working properly.
Step 3: setting admin password
The last part of the tutorial will ask you to set an admin password, that will be asked everytime you'll try to access the admin area via http://example.com/admin . For more security, you can also erase the "admin" folder entirely and put it there just when needed, or restricts that folder the be accessible only from localhost and so on.
Conclusions
Here we are, you should have your OCS server up and running now! You can use it with any kind of client that supports OCS. We built a webclient sized to KDE's needs that you're free to use, modify and adapt.
