Necessitas/Qt4Creator: Difference between revisions
(This page has old content.) |
|||
| (12 intermediate revisions by 2 users not shown) | |||
| Line 1: | Line 1: | ||
{{Note|This page has old content. See page history.}} | |||
== Introduction == | == Introduction == | ||
| Line 45: | Line 47: | ||
==== Get the sources ==== | ==== Get the sources ==== | ||
The QtCreator sources for Necessitas are available from the official git repository at the following url: git:// | The QtCreator sources for Necessitas are available from the official git repository at the following url: git://anongit.kde.org/android-qt-creator.git | ||
To clone the repository, the usual command is: | To clone the repository, the usual command is: | ||
git clone git:// | git clone git://anongit.kde.org/android-qt-creator.git | ||
You need internet access, of course. A new folder called android-qt-creator. This folder will contain the entire QtCreator sources both before and after the build, so place it where you have plenty of free disk space and where you plan to install the framework. | You need internet access, of course. A new folder called android-qt-creator. This folder will contain the entire QtCreator sources both before and after the build, so place it where you have plenty of free disk space and where you plan to install the framework. | ||
| Line 75: | Line 77: | ||
Before starting, make sure you have both ant and a Java JDK installed in your system. More details on this can be found on the [[Necessitas/InstallSDK]] page, since it differs for Windows, Linux and MacOSX. | Before starting, make sure you have both ant and a Java JDK installed in your system. More details on this can be found on the [[Necessitas/InstallSDK]] page, since it differs for Windows, Linux and MacOSX. | ||
All the following configuration | All the following configuration options are located in the menu ''Tools'' >> ''Options'' except for on MacOSX: it's accessible in ''NecessitasQtCreator'' >> ''Preferences...'', or | ||
by pressing Command+. | |||
=== Specify the Qt Framework === | === Specify the Qt Framework === | ||
First of all you need to make sure that your QtCreator can see the Android Qt framework. Select the ''Qt'' tab and check that it reads something like in the following picture: | First of all you need to make sure that your QtCreator can see the Android Qt framework. Select the ''Build & Run'' section then the ''Qt Versions'' tab and check that it reads something like in the following picture: | ||
[[ | [[File:qt_creator_build_&run.png]] | ||
(this is for the | (this is for the Linux version, your paths might be different!) | ||
If you don't see any '''Necessitas''' Qt Version, you need to select the ''Add'' button and point the file browser to the '''qmake''' executable which can be found under the '''bin''' folder of your Android Qt framework. If you | If you don't see any '''Necessitas''' Qt Version, you need to select the ''Add'' button and point the file browser to the '''qmake''' executable which can be found under the '''bin''' folder of your Android Qt framework. If you have compiled it from sources, you should know where it is. Otherwise, search for ''qmake'' in your filesystem and pick the right one! | ||
=== | === Specify the Android Compiler === | ||
The next step is to make sure that your Android toolchain (compiler and debugger) is in place and correctly configured. | The next step is to make sure that your Android toolchain (compiler and debugger) is in place and correctly configured. | ||
Open the '' | Open the ''Build & Run'' options section then click on the ''Compilers'' tab and check that there is at least one entry called ''Android GCC'', like in the following screenshot: | ||
[[File: | [[File:Qt_creator_build_run_compilers.png]] | ||
(this is from the | (this is from the Linux version, check your paths...) | ||
If it's missing, you must select the ''Add'' button and point it to your Android NDK binary folder. If you have installed the Necessitas SDK, it should be located immediately inside the installation folder. | If it's missing, you must select the ''Add'' button and point it to your Android NDK binary folder. If you have installed the Necessitas SDK, it should be located immediately inside the installation folder. | ||
| Line 102: | Line 104: | ||
Necessitas needs to access both the Android SDK and the Android NDK. Open the ''Android'' tab options and check that all the paths are properly specified, as in the following screenshot: | Necessitas needs to access both the Android SDK and the Android NDK. Open the ''Android'' tab options and check that all the paths are properly specified, as in the following screenshot: | ||
[[File: | [[File:qt_creator_android.conf.png]] | ||
(this is from | (this is from Linux, please check your paths!) | ||
Here is the details of the paths you need to enter: | Here is the details of the paths you need to enter: | ||
| Line 110: | Line 112: | ||
* '''Android NDK location''': point to the root of the Android NDK (if you have installed the Necessitas SDK it's the android-ndk-r6b folder located inside the installation folder) | * '''Android NDK location''': point to the root of the Android NDK (if you have installed the Necessitas SDK it's the android-ndk-r6b folder located inside the installation folder) | ||
* '''Toolchain version: select the latest version, but usually you have no choices here. | * '''Toolchain version: select the latest version, but usually you have no choices here. | ||
* '''Ant location''': specify the full path to your '' | * '''Ant location''': specify the full path to your ''ant'' executable. On linux, it's usually under your '''/usr/bin''' folder. On Windows and MacOSX, it's installed by the Necessitas SDK. | ||
* '''arm GDB location''': specify the full path to the ''gdb'' executable provided with your Android NDK installation. | * '''arm GDB location''': specify the full path to the ''gdb'' executable provided with your Android NDK installation. | ||
* '''arm GDB location''': specify the full path to the arm specific ''gdb'' executable provided with your Android NDK installation. | * '''arm GDB location''': specify the full path to the arm specific ''gdb'' executable provided with your Android NDK installation. | ||
Latest revision as of 19:18, 23 September 2023
Introduction
The Necessitas QtCreator if the centerpiece of developing with Qt on Android. It allows you to write code in C++ without caring for all the complexity of deploying it as a shared library wrapped up into a Java Activity, creating an APK, sign it and deploy to the device.
If you have experience in Android development, you know that's a bit different from the Qt approach. The Necessitas QtCreator does everything for you!
Of course you could use any QtCreator with the Android Qt framwork, but you would get no integration.
Obtaining Necessitas' Qt Creator
download the binaries (Windows, Linux, MacOSX)
The simplest way is to download the Necessitas/InstallSDK. Install it for your development platform and enjoy! You don't have to do nothing more.
Compiling from sources
Only if you want to be on the bleeding edge and try out the latest changes and features, you can feel brave and build the latest release from git.
Please note that the build process is supported only for Linux.
These instructions are tailored for Linux, Ubuntu linux 12.04. Any Linux distribution which is reasonably updated should work anyway. There are some minimum GLIBC/GCC requirements, but anything updated at least at 01/2012 should not have any problems, provided that you fullfill all the requirements either by installing you distro packets or from sources. Ubuntu 12.04 do include all the requirements in the default repositories.
Requirements
First of all, you need a working Linux installation. On this Wiki page Ubuntu 12.04 will be used as a reference, please note that any flavor of Linux should work.
Compiling the QtCreator is a long task and shall take time even on powerful hardware. It is suggested a modern CPU and as much RAM as you can. Expect much less than building the Qt framework, but still quite some time.
Make sure you have at least 20gb of free hard-disk space because of all the requirements and compile time space. Since this is a work-in-progress, the build tree will not be cleaned after the build is complete. So be wise, and increase that filesystem!
To compile QtCreator you don't need all the usual dependency of Necessitas. But make sure your distribution has all the usual build tools. On Ubuntu, you want to make sure that the following packages are installed (use the package manager):
build-essential
git
It might be time to install also these packages, which are required for Necessitas SDK and not for building Qt directly:
OpenJDK
ant (minumum version 1.8)
The QtCreator build process requires the Qt framework in place. Do not get confused... you do not need the Android Qt framework nor Necessitas! What you need is a recent release of the Qt framework for linux! The easiest way is to grab the Nokia Qt SDK from http://qt.nokia.com/downloads, download wither the online or offline version, as you prefer, and install it on your machine. Just remember the path where you have installed it because you will need it soon.
Please note that a reasonable recent version of the Qt framework is required. At very least Qt 4.7.4, but probably Qt 4.8 will be mandatory soon.
Get the sources
The QtCreator sources for Necessitas are available from the official git repository at the following url: git://anongit.kde.org/android-qt-creator.git
To clone the repository, the usual command is:
git clone git://anongit.kde.org/android-qt-creator.git
You need internet access, of course. A new folder called android-qt-creator. This folder will contain the entire QtCreator sources both before and after the build, so place it where you have plenty of free disk space and where you plan to install the framework.
Compile!
To compile QtCreator, you must first run qmake, then make. When running qmake, be sure to specify the full path to the Qt framework you are using. If you have installed the Nokia Qt SDK as suggested above, just remember the full path and add bin/qmake to it. So get into the sources folder:
cd android-qt-creator
/full_path_to_installed_qt_framework/bin/qmake -r
make -j3
(you have to replace 3 with the number of CPU or cores your PC have + 1)
This will take a while... So sit back, grab a coke, a pizza maybe... maybe a short shower if it's too hot, specially in summer time.
When it's done, go to the next paragraph: Setting up Qt Creator!
Setting up Qt Creator
If you have installed the Necessitas SDK everything should be already configured, but you might want to check your configuration if something is not working properly...
If you have conpiled from sources, you definitely need to setup your Qt Creator!
Before starting, make sure you have both ant and a Java JDK installed in your system. More details on this can be found on the Necessitas/InstallSDK page, since it differs for Windows, Linux and MacOSX.
All the following configuration options are located in the menu Tools >> Options except for on MacOSX: it's accessible in NecessitasQtCreator >> Preferences..., or by pressing Command+.
Specify the Qt Framework
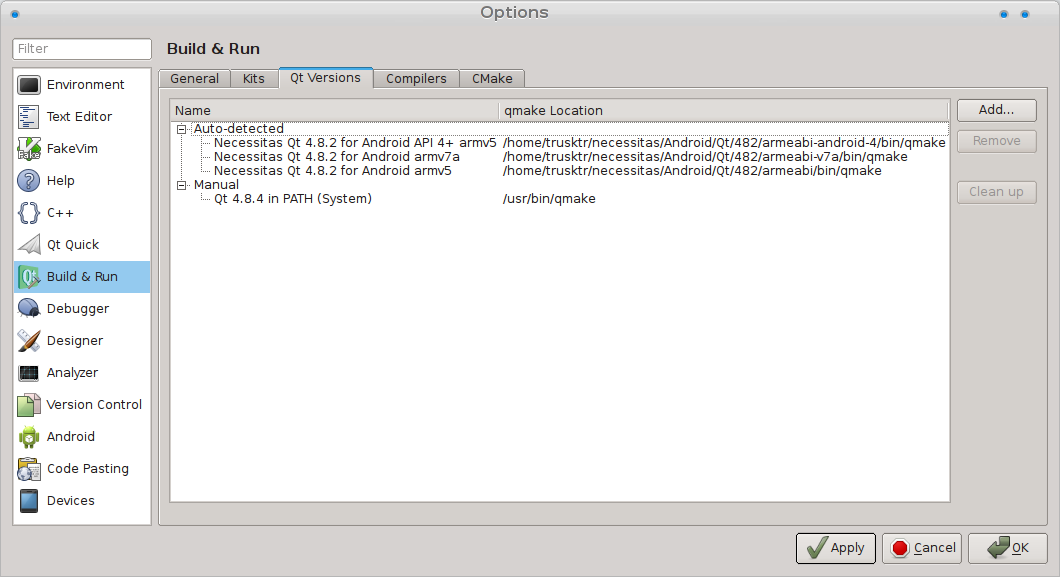
First of all you need to make sure that your QtCreator can see the Android Qt framework. Select the Build & Run section then the Qt Versions tab and check that it reads something like in the following picture:
 (this is for the Linux version, your paths might be different!)
If you don't see any Necessitas Qt Version, you need to select the Add button and point the file browser to the qmake executable which can be found under the bin folder of your Android Qt framework. If you have compiled it from sources, you should know where it is. Otherwise, search for qmake in your filesystem and pick the right one!
Specify the Android Compiler
The next step is to make sure that your Android toolchain (compiler and debugger) is in place and correctly configured.
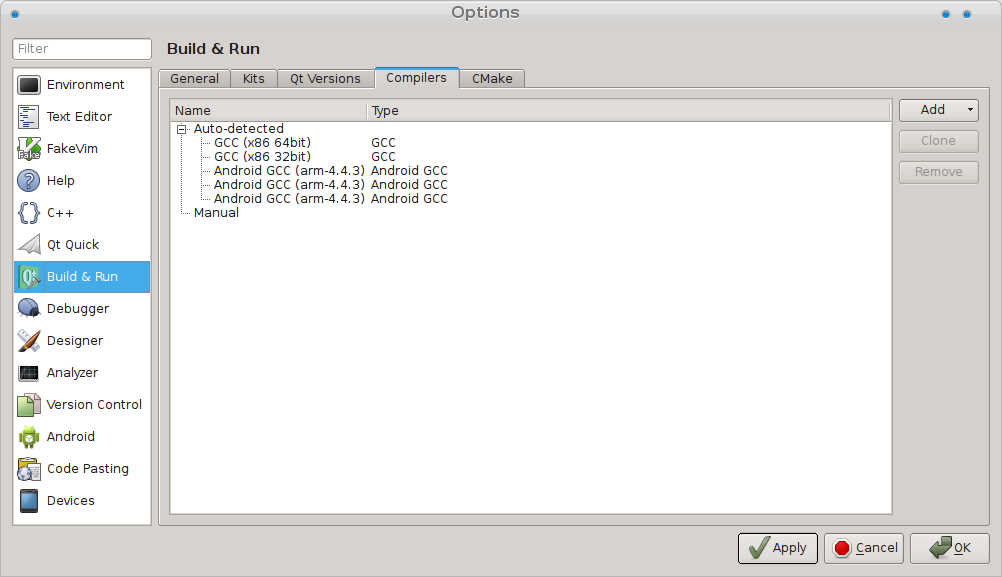
Open the Build & Run options section then click on the Compilers tab and check that there is at least one entry called Android GCC, like in the following screenshot:
 (this is from the Linux version, check your paths...)
If it's missing, you must select the Add button and point it to your Android NDK binary folder. If you have installed the Necessitas SDK, it should be located immediately inside the installation folder.
Specify the Android SDK, NDK and the other paths
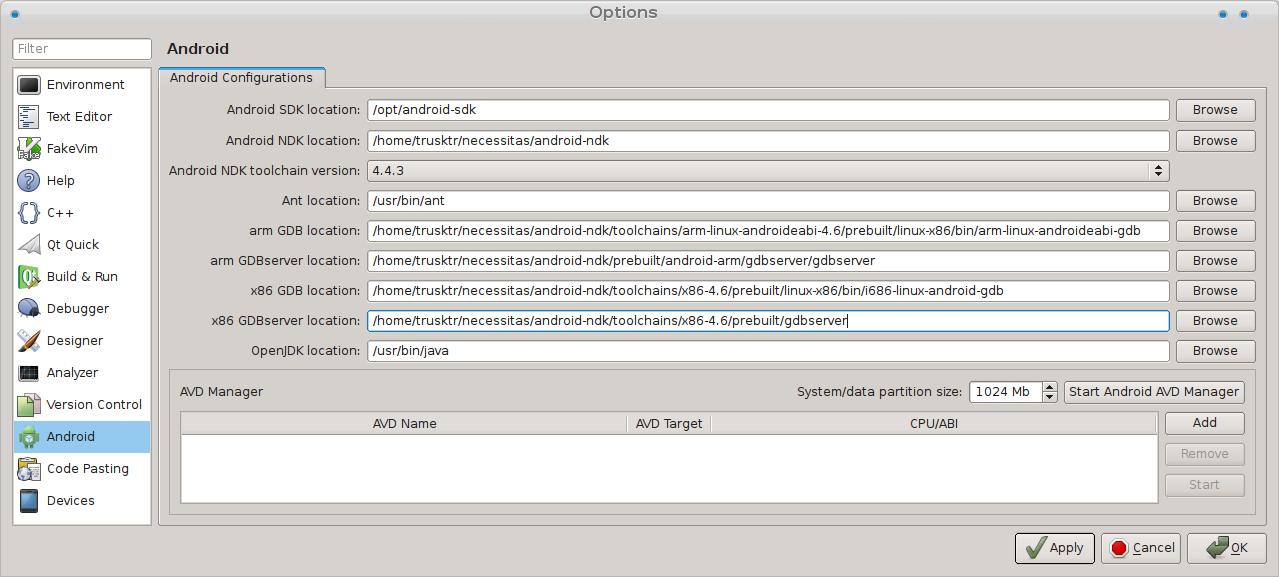
Necessitas needs to access both the Android SDK and the Android NDK. Open the Android tab options and check that all the paths are properly specified, as in the following screenshot:
 (this is from Linux, please check your paths!)
Here is the details of the paths you need to enter:
- Android SDK location: point to the root of the Android SDK (if you have installed the Necessitas SDK it's the android-sdk folder located inside the installation folder)
- Android NDK location: point to the root of the Android NDK (if you have installed the Necessitas SDK it's the android-ndk-r6b folder located inside the installation folder)
- Toolchain version: select the latest version, but usually you have no choices here.
- Ant location: specify the full path to your ant executable. On linux, it's usually under your /usr/bin folder. On Windows and MacOSX, it's installed by the Necessitas SDK.
- arm GDB location: specify the full path to the gdb executable provided with your Android NDK installation.
- arm GDB location: specify the full path to the arm specific gdb executable provided with your Android NDK installation.
- arm GDBserver location: specify the full path to the arm specific gdbserver executable provided with your Android NDK installation.
- x86 GDB location: specify the full path to the x86 specific gdb executable provided with your Android NDK installation.
- x86 GDBserver location: specify the full path to the x86 specific gdbserver executable provided with your Android NDK installation.
- Open JDK location: specify the full path to your Java JDK root folder. Under MacOSX this can be blank, on the other platforms it must be filled.

